
When my wife and I were on the brink of purchasing our first motor home, we asked for each others' pros and cons about RV use and ownership. Based upon our single experience three years prior with a one-week motor home rental, my primary reservation concerned waste management. Partly because of the novelty, partly the fact that our rental's tank gauges now appear to have been ridiculously pessimistic (resulting in us never going more than a day without dumping), and the general ickiness of RV waste management infrastructure, this issue dominated that first trip.
On the way back from seeing our future 2006 Itasca Navion 23J for the first time, we made our first-ever stop at a Camping World store. As we wandered the accessories showroom, I spied a display on which was mounted a Thetford Sani-Con system. I walked closer, and read the details. I found my wife in the store, and said, "Look at this thing." As she started to read the display, I said, "It's a macerator." She screwed up her face in an appropriate sign of disgust. I said, "It grinds it up and pumps it through the tube." We giggled and continued our tour of the store.
Later that night, as we continued our frantic non-stop RV research for the third week, I ran across this blog article. Its author, a 30-year boating veteran named Richard, was new to RVing when he bought his 2009 Navion 24J. He decided that rather than use the sewer system familiar to all motor home users, he would add a macerator just like the ones used for black water management in all his boats. His blog presented the fitting a Sani-Con system to his Navion. His blog explained that significant modifications had to be made to the Navion to accommodate a Sani-Con Twist-On macerating pump. Thetford's Sani-Con product line, as well as RV macerators from competitors Flojet and SHURflo, are marine-application motors and macerator pumps with custom fittings for the 3" bayonet-mount waste water hose fitting common to RVs.
As Richard described, Thetford advertises. and I now know first-hand, using the Sani-Con means:
Two powerfully-compelling abilities surfaced that Sani-Con systems provide:
Those two points addressed a number of scenarios, not the least of which is that we could pump the tanks in our driveway to the sewer clean-out in the front of our house (I'd been considering having a sewer connection installed in our yard for the RV). With an AC extension cord, fresh-water hose and inexpensive waste-water garden hose, our RV becomes a semi-permanent dwelling as long as a house is with 300 feet. This adds tremendous flexibility to using a motor home.
Sani-Con's promotional tag line is, "Easier than pumping gas!" To which I say, "Not quite as easy as pumping gas - but a LOT easier and a LOT more sanitary than traditional RV waste management."
Even as we were about to make an offer on our Navion, I was intrigued by the possibilities of using a macerator. We planned a BIG trip - 8,000 miles - immediately following purchase. If the Sani-Con worked as well as advertised, and because blog-author Richard had reported success, I madly researched what would be involved in doing this myself.
Working entirely from Richard's blog text and photos and not having yet purchased our RV made for complex development and planning. I could see from photos we'd taken of the '06 Navion that its Water Service Center compartment (which I'll refer to the "WSC" for the remainder of this article) was of a different shape - at least the compartment opening - from Richard's '09 Navion 24J. The problem with mounting a Sani-Con (or any other macerator, as far as I know) in both the '06 Navion 23J and '09 Navion 24J is that there is no room within the WSC for the system. Sure, you could attach and detach one of the "portable" Sani-Con systems to the waste outlet every time you were emptying your tanks, but that's not my goal. With that scenario, you're still disconnecting the pump from the waste fitting, and having to store the pump - again immediately after raw sewage exposure. And though some RVs may have room for the "twist-on" models of macerator to remain in place all the time, on the '06 Navion, this would leave the pump hanging down to within inches of the road surface, ready to be ripped off (along with the most of your waste water system plumbing) on any driveway or speed bump.
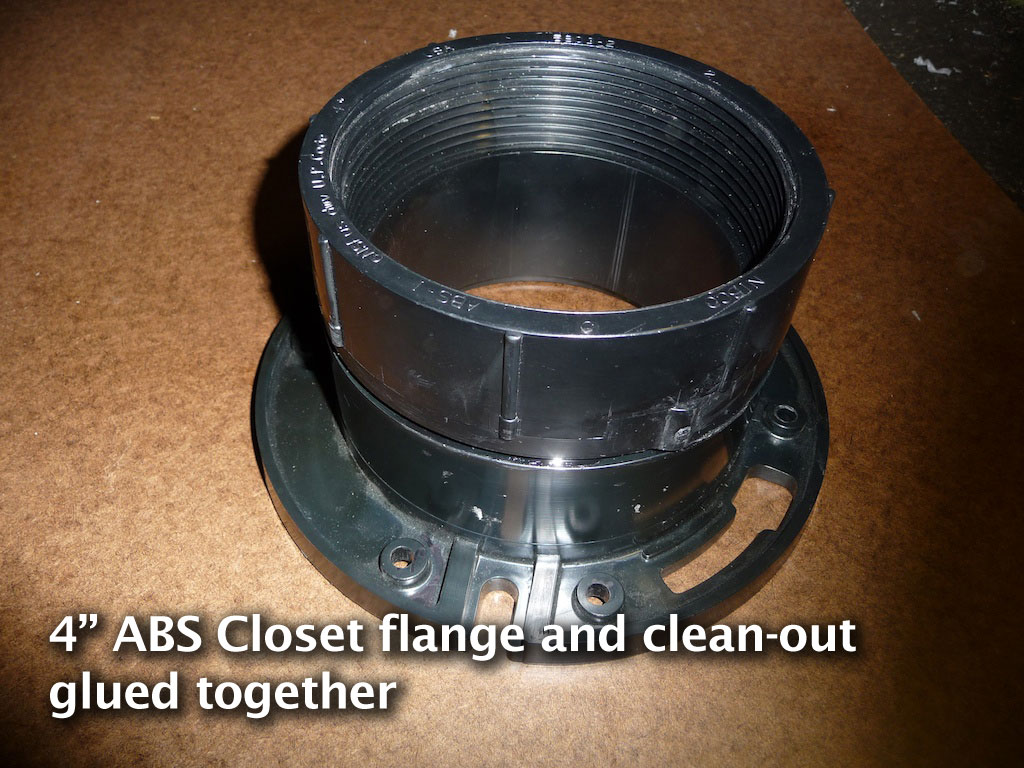
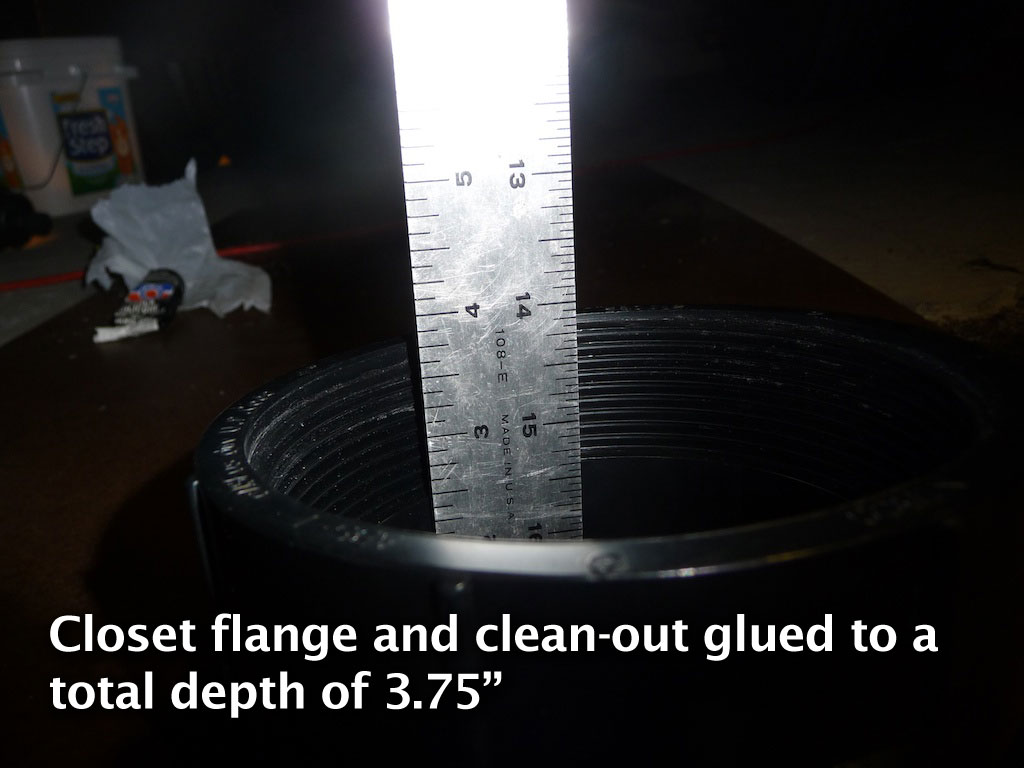
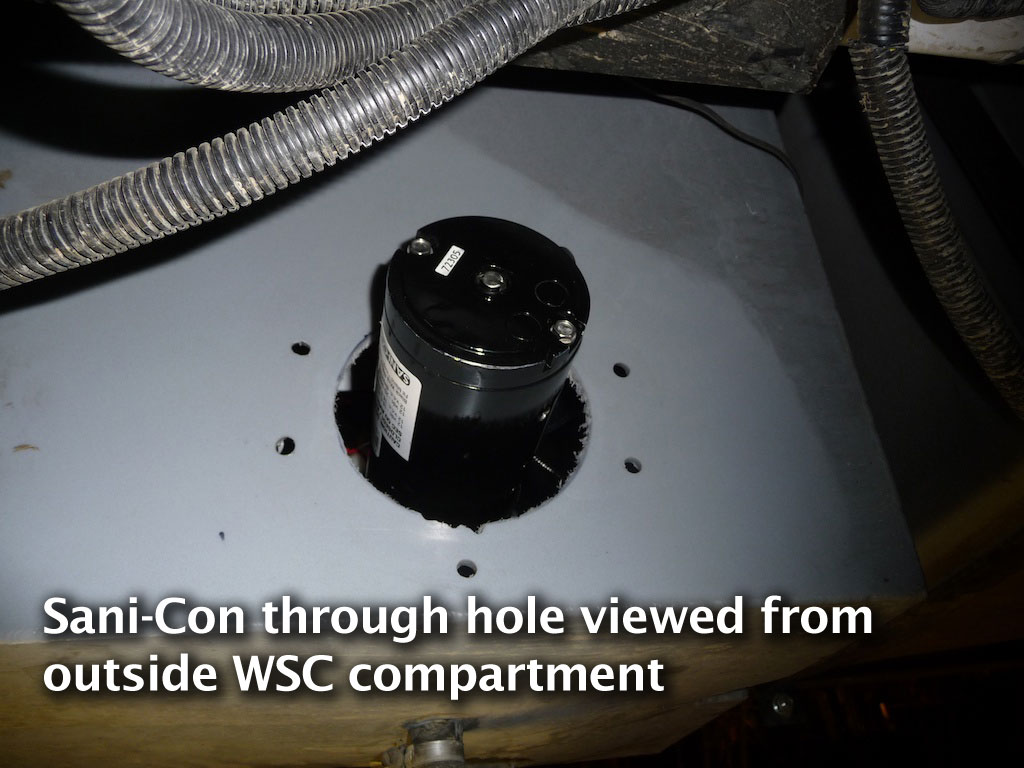
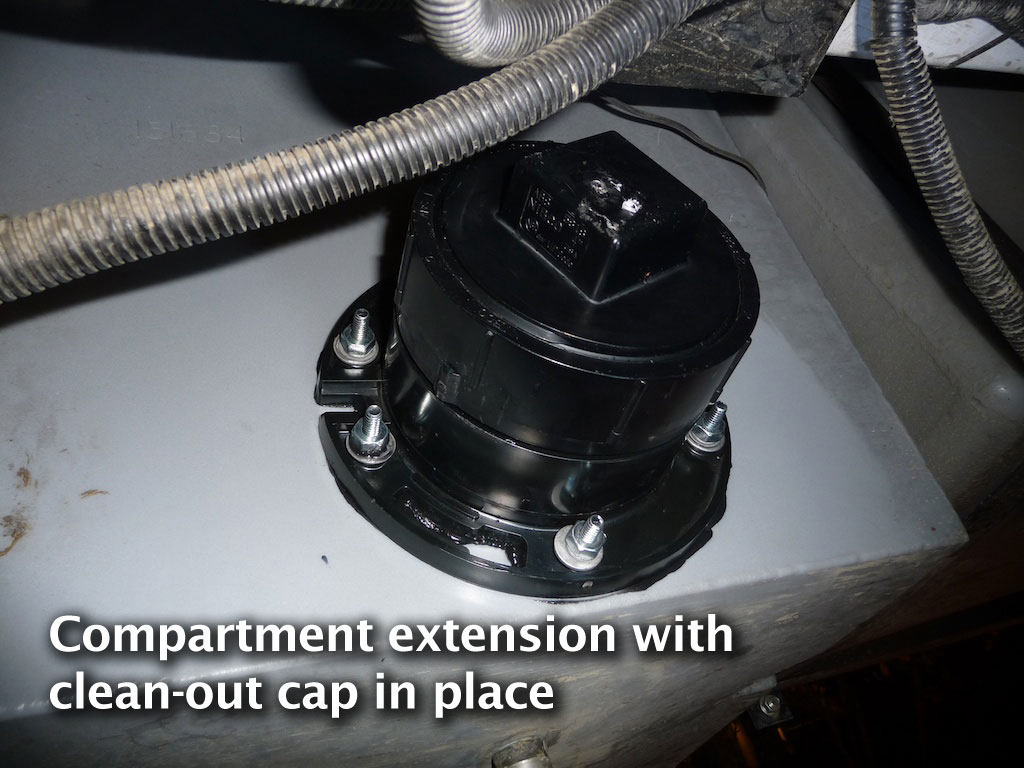
The solution in Richard's blog (much of which was conceived by the service people at Lewis RV in Dayton, Ohio) was clever, if complex to execute. The Navion WSC houses the grey and black water dump valves, fresh water connection, a fresh water routing valve and optional outdoor shower head in an exterior compartment at the bottom-rear of the vehicle's left side. Behind a hinged door, all these components are contained within a polypropylene plastic "tank" to protect them from road grime and provide a convenient place to store water accessories. Interpreting all the issues from only the blog text and a handful of photos, I saw that they cut an opening in the wall of the WSC and mounted the Sani-Con pump horizontally so that it protruded out through this hole. To protect it from the elements, they covered the protruding end of the pump by mounting round 4" PVC plumbing pieces to the tank around the hole - conceptually extending a cylindrical part of the WSC out to enclose the Sani-Con pump. They terminated this WSC Extension piece with a threaded PVC "clean out" fitting, which allows critical access to a screwdriver-slot in the base of the Sani-Con motor used for fixing pump jams (just like a garbage disposal).
It's important to note that the WSC compartment is NOT water-tight. It doesn't need to be. In fact, it has a drain tube extending beneath. So any solution for extending the WSC wall doesn't have to be perfect - just keep out the dirt.
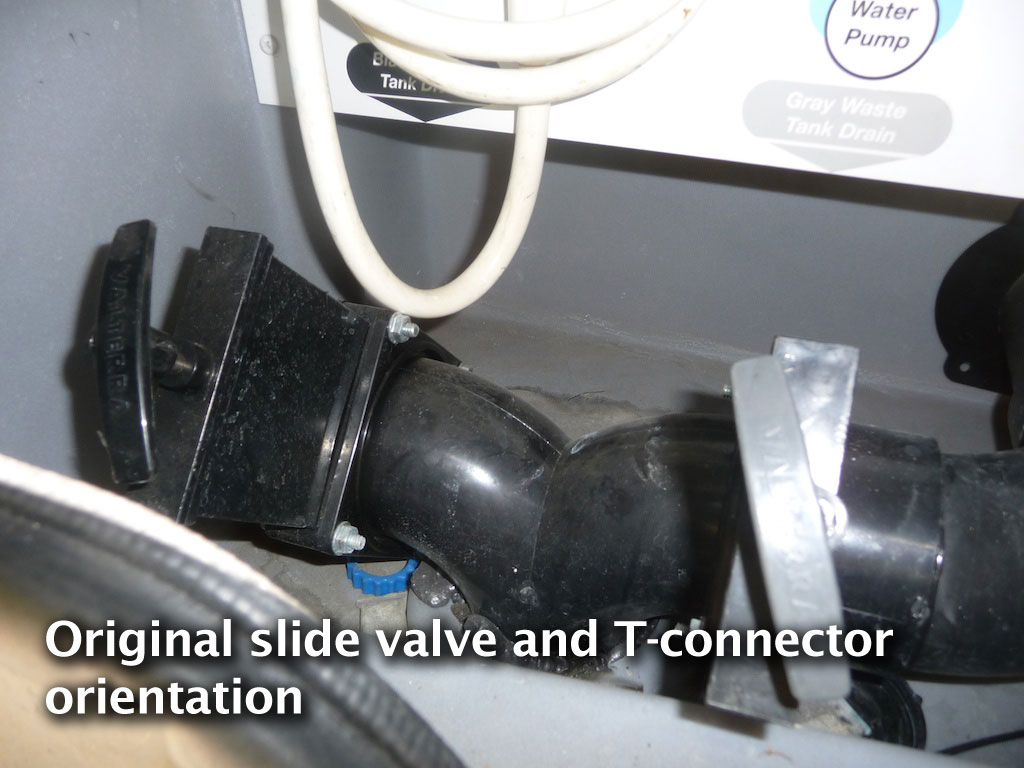
In order to do this, Richard described that they turned the T-connection fitting "90 degrees." This means that rather than exiting down underneath the RV at it comes from the factory, his waste hose fitting exits horizontally, inside the WSC. To this fitting - which normally receives a 3" waste hose - is permanently mounted the Sani-Con "Twist-On" system, which extends through a hole cut in the wall of the WSC. I puzzled over getting the correct position of the big hole I'd be cutting/drilling in the WSC, and having enough room to install the Sani-Con, even with the WSC Extension.
After taking delivery of our Navion, I immediately set to work on several modifications. Though we had over two months of summer vacation window, I'd estimated our trip would take six weeks (it did exactly). For two weeks, we worked like mad.
I took measurements of the waste system in the Navion. I drafted scale drawings of the systems. I scanned photographs of Sani-Con systems and estimated their dimensions. Optimistically, I ordered a Sani-Con Box-Mount system, hoping that there would be some way I could get it to fit within the WSC and not have to attempt the "through the wall" modification. I couldn't. I sent the Box-Mount back and ordered a Twist-On system, conceding that it would have to be the Richard's "WSC Extension" idea.
For the longest time during the development phase, I attempted to use the approach described in Richard's blog, in which they used two interlocking 4" PVC pieces, and joined them together through the hole, sandwiching the wall of the WSC between. This was an appealing mechanical retention idea, so I stuck with it for the longest time. However, it presented a significant potential complication: If I used a flanged PVC piece on either side of the WSC wall, then some amount of flange would protrude into the WSC compartment. From my early scale drawings of the project, there was not much distance between the re-positioned T-connector bayonet and the wall of the WSC, making it potentially tricky to actually get the Sani-Con into the WSC Extension and on to the 3" bayonet connector. The additional depth of the flange might make it nearly impossible. I mocked up a scale diagram and convinced myself that it was a serious issue - a possible deal-breaker on installation day.
(click and hold on any image to zoom larger)
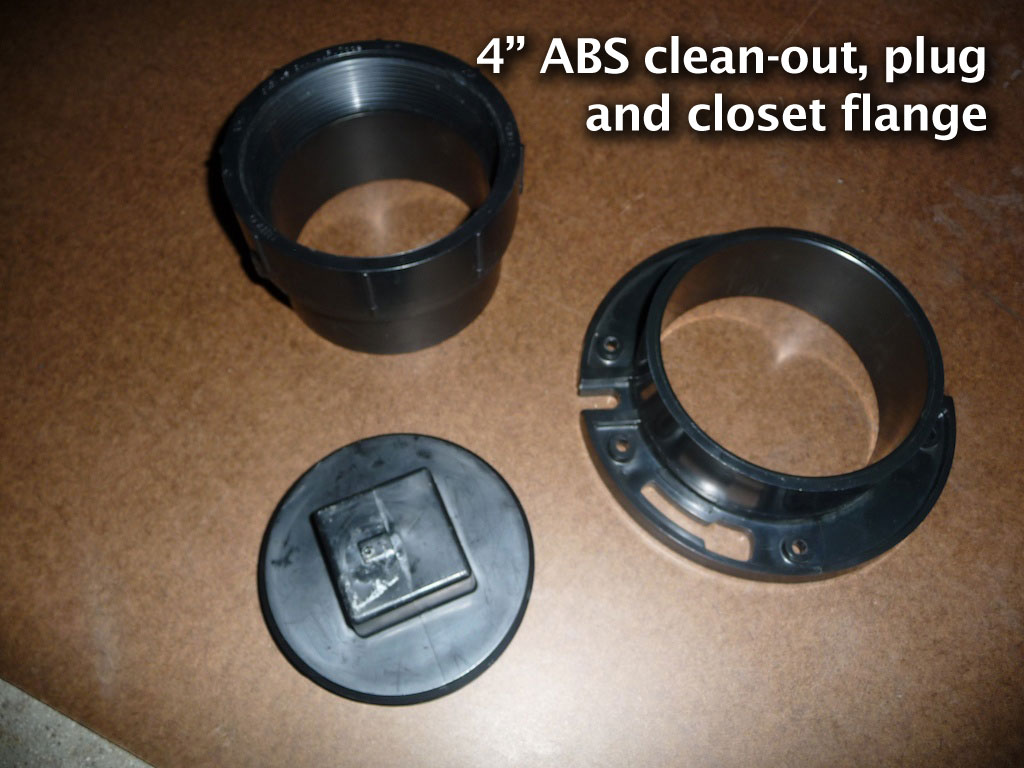
For days I pondered how to approach the WSC Extension (while also incessantly planning, packing and shopping for a 40-day trip, as well as developing storage organization solutions for the Navion). I bought PVC parts, and measured and played with them. Finally, while ruminating over the problem in the plumbing department of Home Depot or Lowe's (I do this a lot - wandering hardware stores in source of inspiration, even when I don't have a project), I was looking at an ABS "closet flange" (the last piece of the plumbing system which attaches to the bottom of a household toilet), and it hit me: Don't worry about clamping the WSC wall between two pieces of [PVC] - just screw it to the outside of the WSC wall. What this new plan allowed:
(click and hold on any image to zoom larger)
I was thrilled with this freeing revelation. No longer was the project a puzzle. It was Waiting To Be Done.
The last week before we left on our massive tour of the U.S. (a real Trial By Fire as RVers), I performed a major modification or installation every day. Every day, the doorbell rang with another delivery of something for the Navion.
In preparation for our big trip, we took a one-night shakedown trip to a nearby RV park. In anticipation of disassembling the waste-water system, I emptied, refilled and emptied, and flushed the black water tank with a couple of gallons of bleach and a tankful of water while we were hooked up at the RV park. I flushed the grey tank with somewhat less bleach. As a parting shot, what I thought was an spare unused sewer hose we'd acquired with the Navion turned out to be more of a long, tubular sieve, spraying black water into the air and onto me. I was not going to miss this process.
Back in our driveway on the day of the Sani-Con install, I flushed the last bleach water from the tanks down the storm drain on our street, reasoning that nothing could have survived the bleaching to contaminate the storm drain system.
Finally, I pulled the waste hose with both grey and black slide valves open. With a drain pan under the waste outlet, I jumped up and down inside the Navion and rocked it around to try and prevent any surprises while taking the valves and T-connector apart. As it turned out, I'd done a good job of flushing the system. Only faint bleach smell persisted, and the parts were fairly clean.
As I would be mounting the operating switch for the Sani-Con elsewhere, I removed the original toggle switch and bracket from the Sani-Con and soldered a few feet of 12 gauge stranded wire leads to the pump's wires before installing the pump.
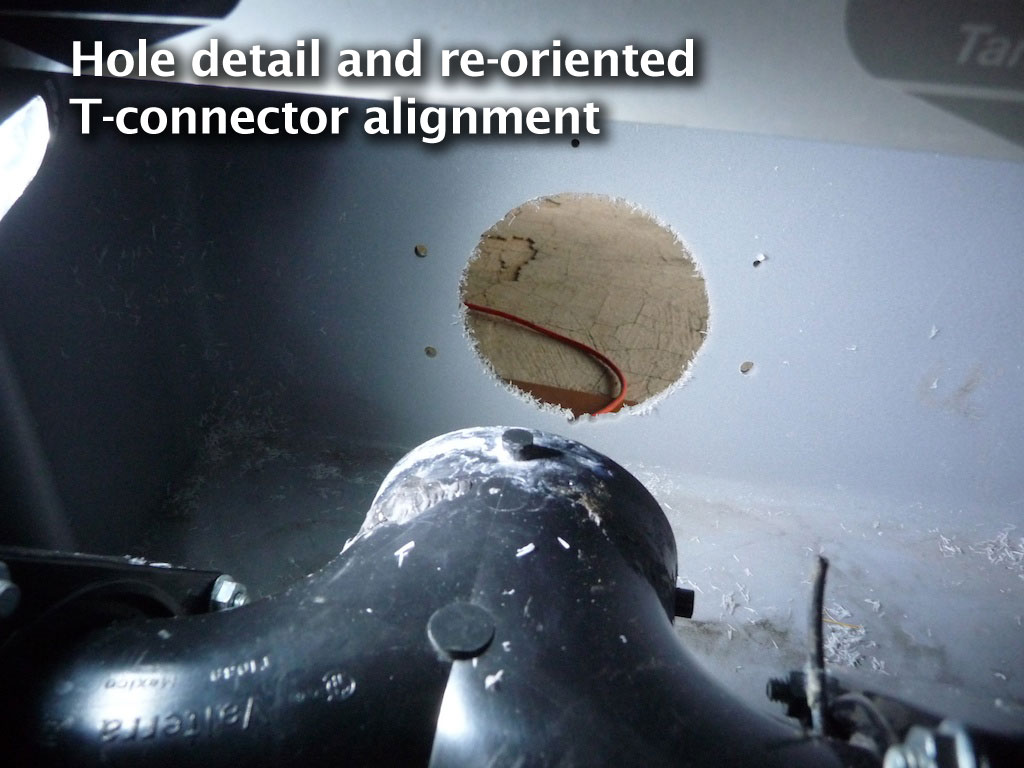
It had never occurred to me that the T-connector between the grey and black dump valves (which provides the common outlet from both tanks to which is connected a 3" waste hose) was NOT part of the square flange through which it bolts to the adjacent slide valves. The T-connector is actually a flanged pipe retained by the separate square flange. The T-connector is free to spin at any angle once the eight bolts (four on the grey side, four on the black) are loosened. For the purposes of this modification, this was great news, allowing me to position the pump and the slide valves at any angle. Unfortunately, I still had to completely remove the valves and T-connector in order to re-orient the T, as the outlet of the T extends down through a hole in the bottom of the WSC, preventing it from turning in place.
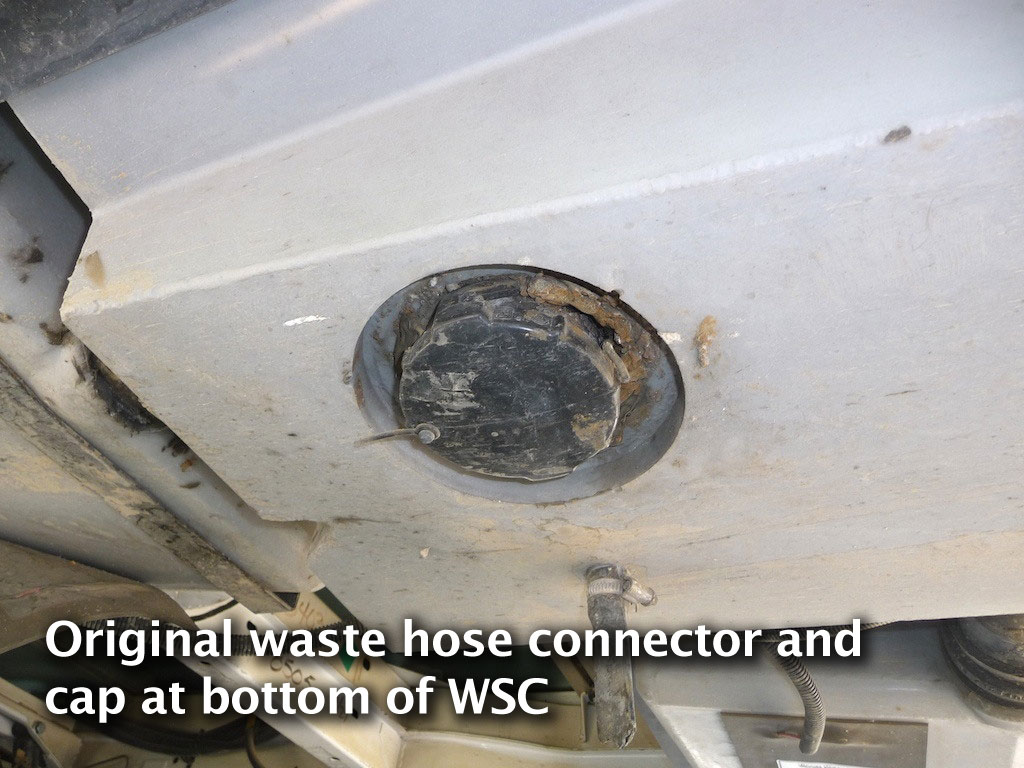
In order to get all the pieces moved enough to re-orient the T pointing inward toward the center of the vehicle, I had to loosen the hose clamps at each tank which couple the plastic tank's molded outlet to a large rubber coupler hose. I also had to remove a split flange which seals the gap where the grey water tank pipe passes through the WSC wall. I don't remember exactly (I'm writing this three months later), but the flange is like three "C"-shaped 160-degree arc sections of a very large, thin steel washer which fits around the 4" ABS pipe coming from the grey water tank through a hole in the wall of the WSC. In practice, this allows a Winnebago installer to pass the pipe through a non-precision over-sized hole in the WSC wall, make all the waste connections (like what we're doing here), then shoot some self-drilling screws through these overlapping flange pieces to both close up the gap around the pipe and help to hold the pipe rigidly in place. Finally, they spray some urethane foam around the outside of the pipe/washer seam.
After removing the screws holding the flange in place, I scraped/carved the black urethane foam away from the outside of the WSC so that the flange pieces could be removed.
Getting to all eight of the bolts and nuts holding the two slide valves and the T-connector together proved tricky, both during disassembling and reassembly. I don't have any memory of particular tricks, methods or tools I used, I just remember it being very awkward. When I finally had it all apart, I regretted not having purchased new slide valves. These have neoprene seals, which will no doubt degrade with time. Slides valves are inexpensive, and I'm really hoping never having to work on this system again. But I was committed to finishing the job on this day, and wasn't sure if I could even do it in a day, so I soldiered on.
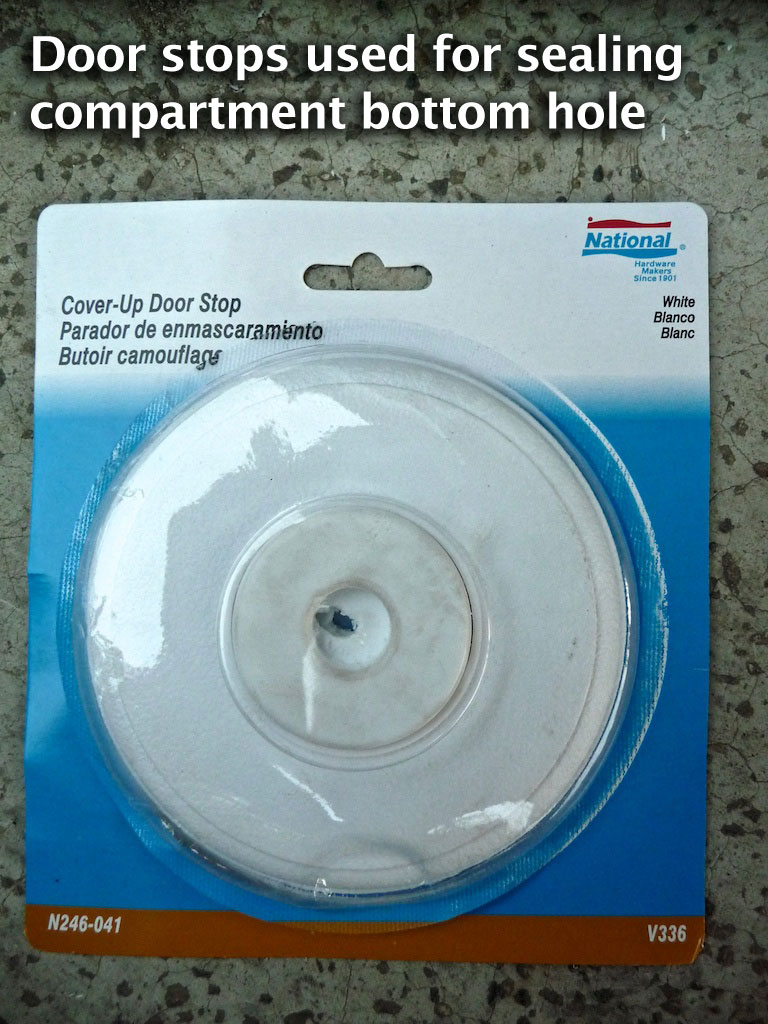
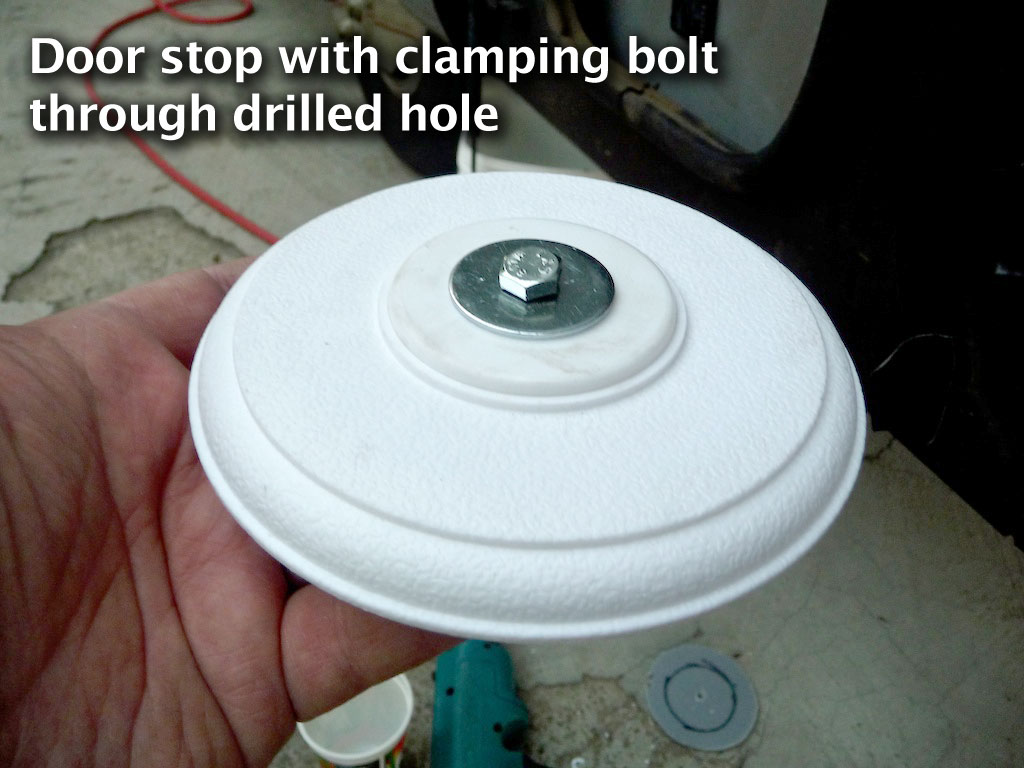
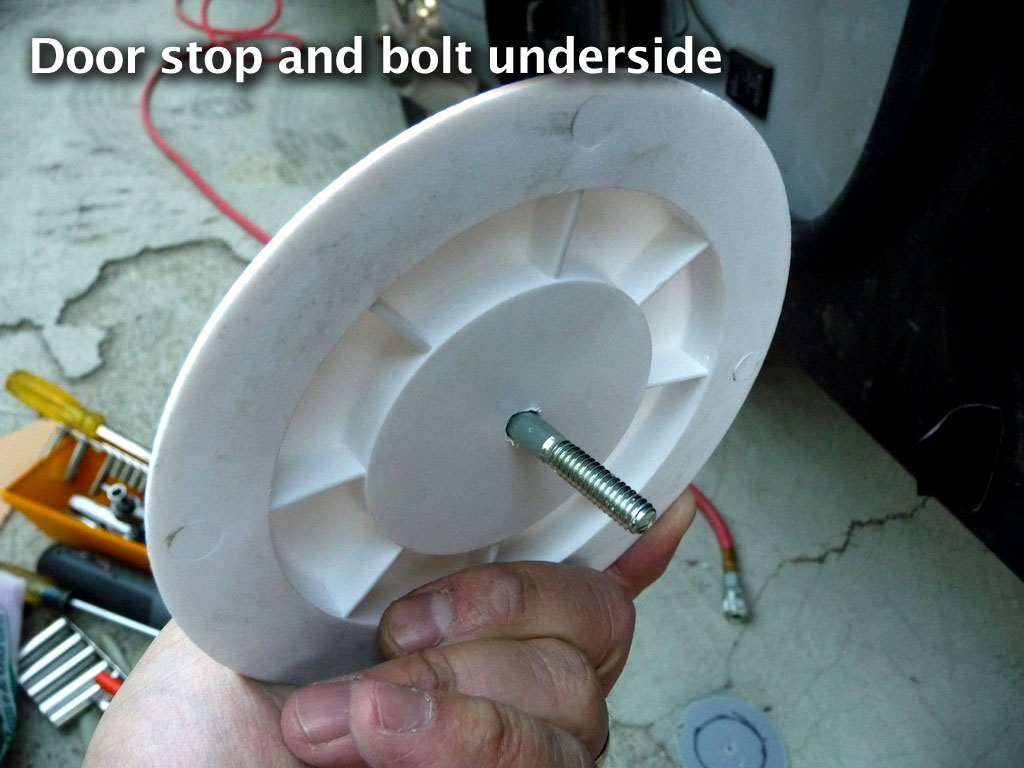
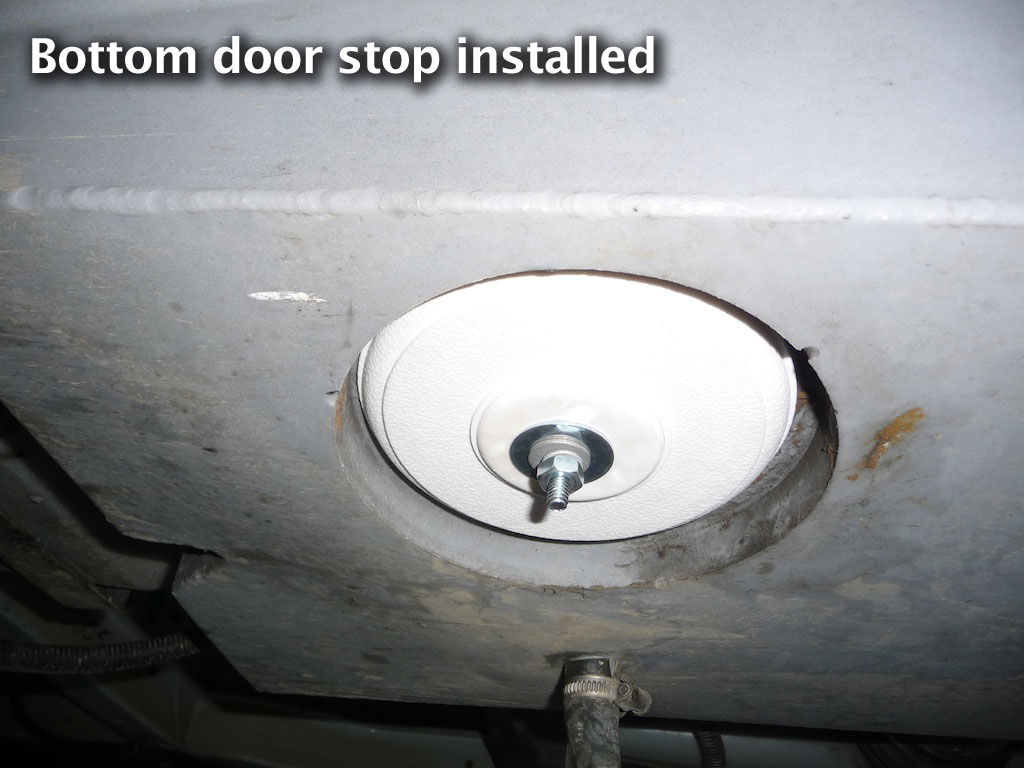
While I had the valves and T-connector removed, I took the opportunity to seal up the hole in the bottom of the WSC where the waste connection had previously exited beneath the vehicle. This could have been accomplished a lot of ways, but I was determined to come up with a reversible, no-damage way to close up the hole. During the dozen or so hardware store trips in those pre-travel weeks, this back-burner search yielded two thick plastic disks which are sold as door-knob bump stops. I wanted something rigid enough that I could simply clamp two disks on either side of the WSC's floor with a single bolt. I drilled a hole through the center of each of the two door stops and clamped the two disks on the top and bottom of the WSC's original underside hole. Perfect.
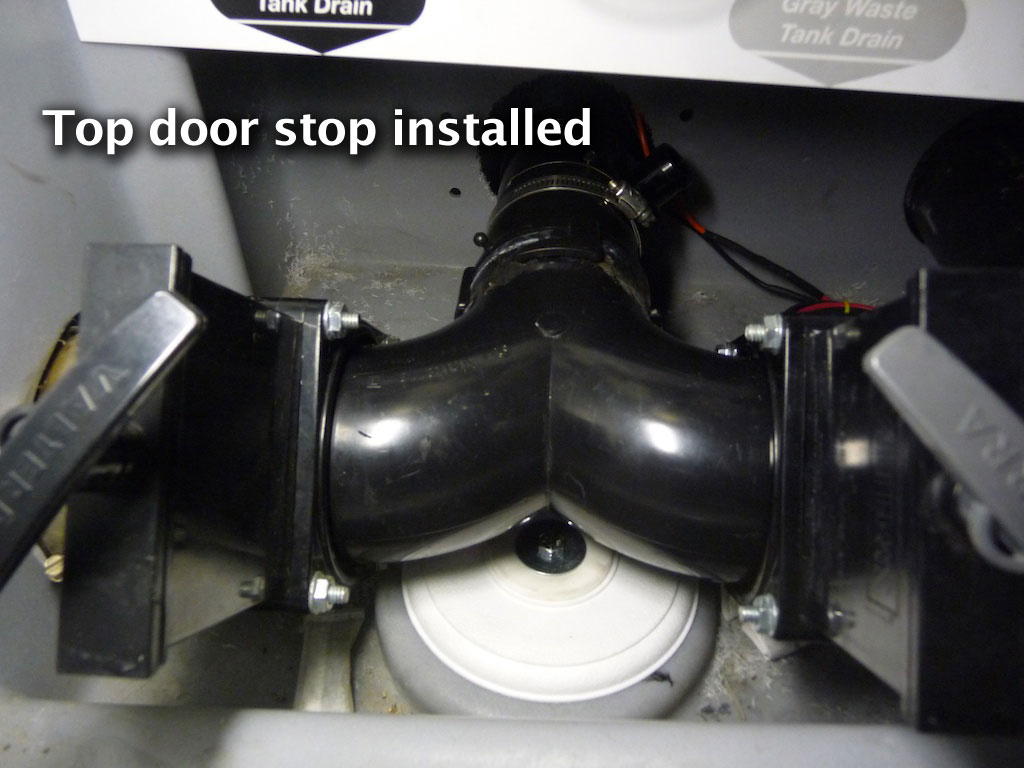
With the hole plugged, I re-installed the valves and T-connector in their new orientation, with the "T" exit pointing inboard to the right side of the vehicle, parallel to the ground. The Sani-Con manual reads: "Most of the sewer pipes will rotate between the valve bodies to allow the pump and motor to be angled up or down. In some cases the pipe can be turned up and the pump and motor may be operated vertically." So any orientation is approved by the manufacturer.
With all the bolts and nuts in place but only finger-tight, I adjusted the slide valve handles to a convenient angle (the valves are also free to rotate while the bolts are loose). I left the bolts loose for the time being.
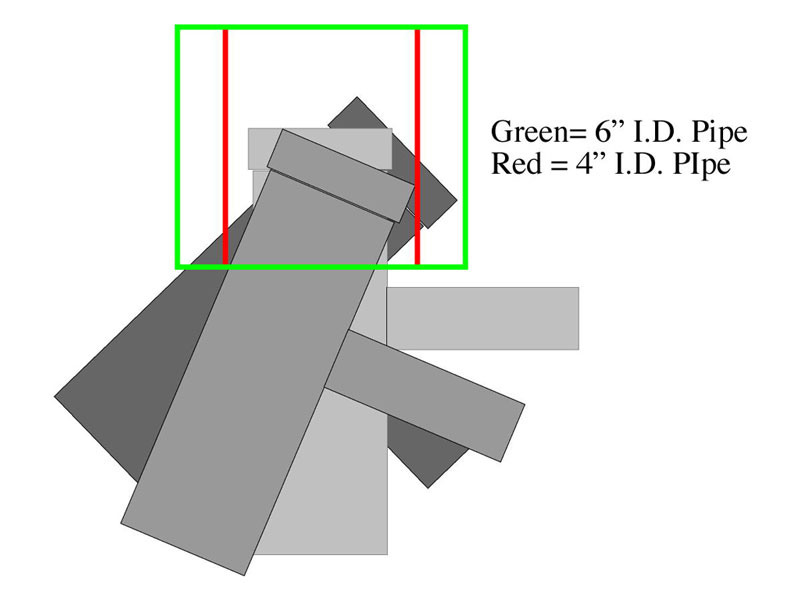
Determining where to cut the big hole in the side of the WSC through which the Sani-Con would protrude was a concern, even if my new "add the compartment extension to the outside" idea made it somewhat less critical. As you can see from the photograph below, the inside diameter of the 4" ABS pipes - and therefore of the hole - allowed for a 1" gap between the 2" diameter Sani-Con and the hole circumference. So I had a 1" margin of error. Still, you can't un-make a hole.
(click and hold on any image to zoom larger)
![]()
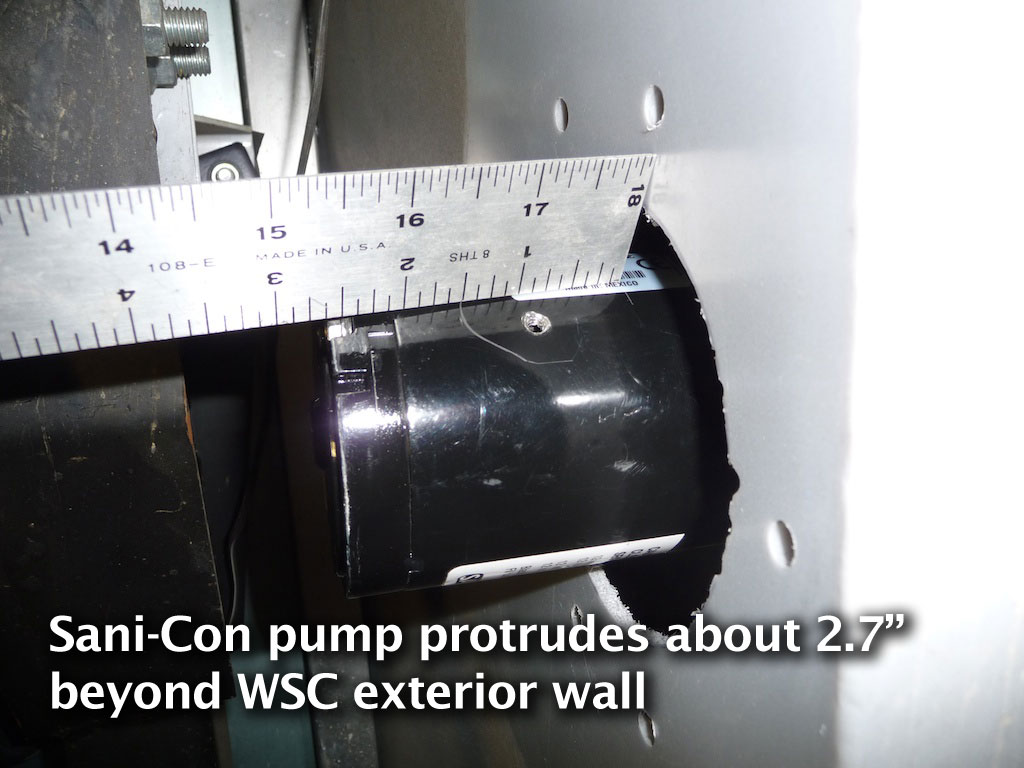
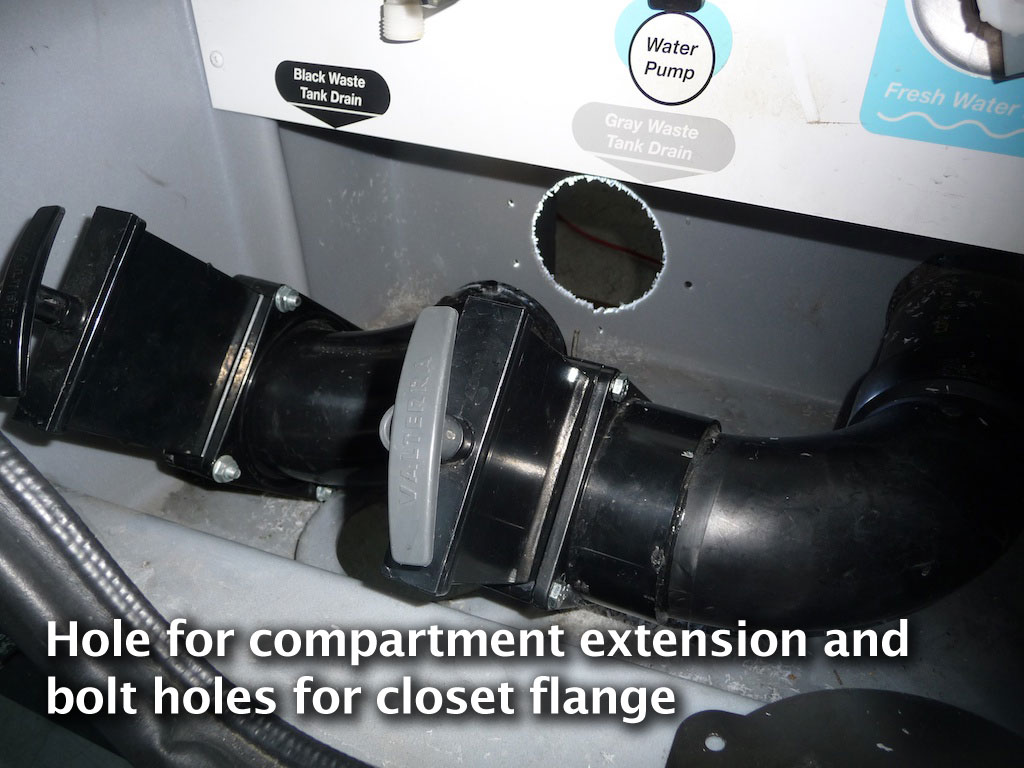
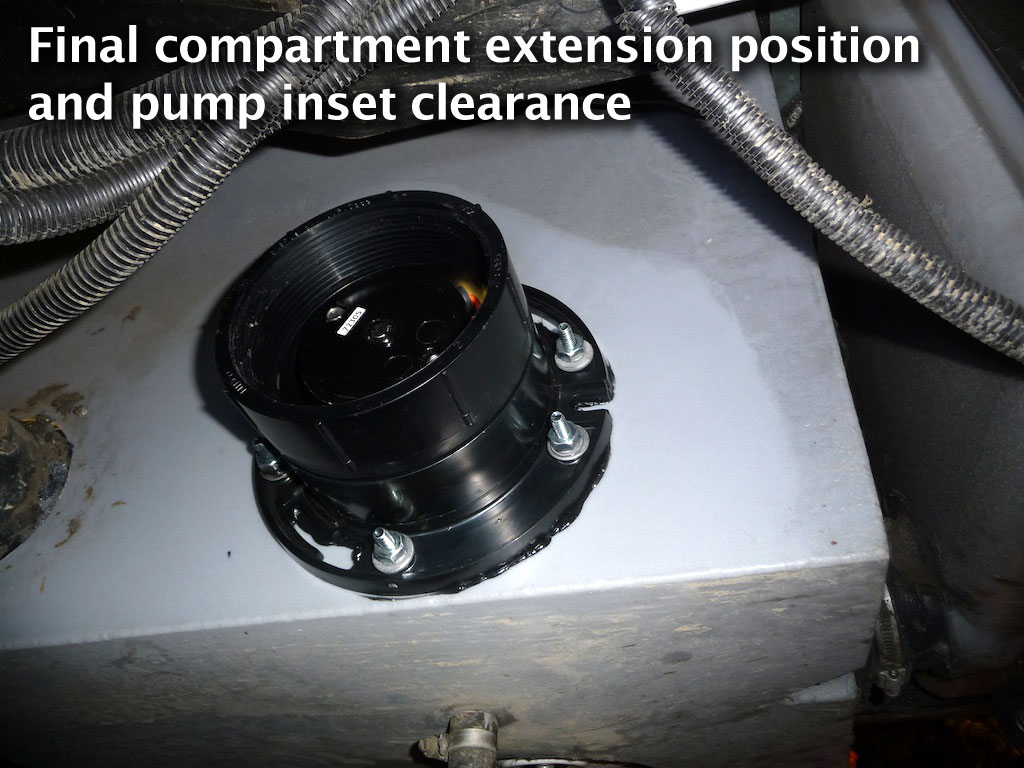
Because I obviously didn't have enough room to install the Sani-Con to locate the hole position, I used a spare sewer-hose female bayonet fitting and a soup can to make a short stand-in for the Sani-Con which would just fit between the T-connector outlet and the wall. I test-fit the ABS closet flange to make sure its flange and bolt holes would all land within the wall of the WSC. When I was satisfied with its orientation, I traced a circle on the wall of the WSC with a marker, guiding it around the circumference of the soup can. I removed my Sani-Con stand-in and eyeballed the center of the circle I'd scribed. I then drilled a small hole through this center mark. Underneath the Navion, there is a mercifully generous amount of working space for this part of the operation. I held up the closet flange around the drilled hole and eyeballed the center, then traced a ring around the inside of the flange.
I believe that the closet flange had only two or four bolt holes, so I drilled the flange to provide six holes about 60 degrees apart. The Water Service Center's polypropylene walls may be thick, but this stuff is pretty soft, so I wanted to distribute the stress of the ABS Compartment Extension bouncing around for the next 100,000 miles.
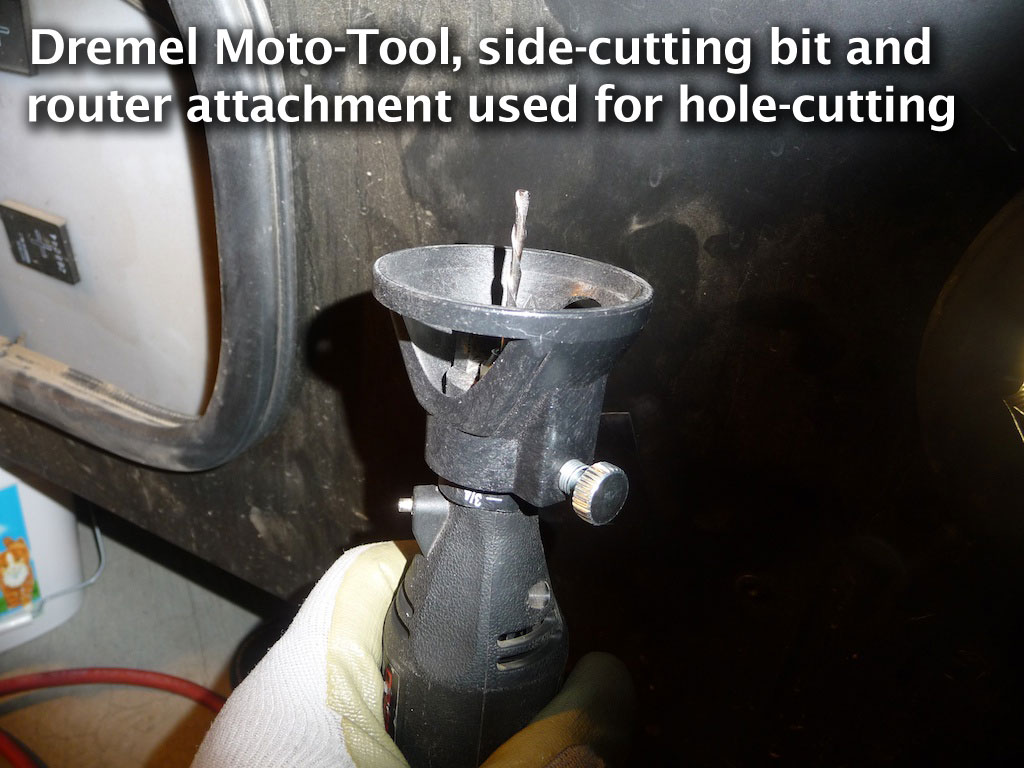
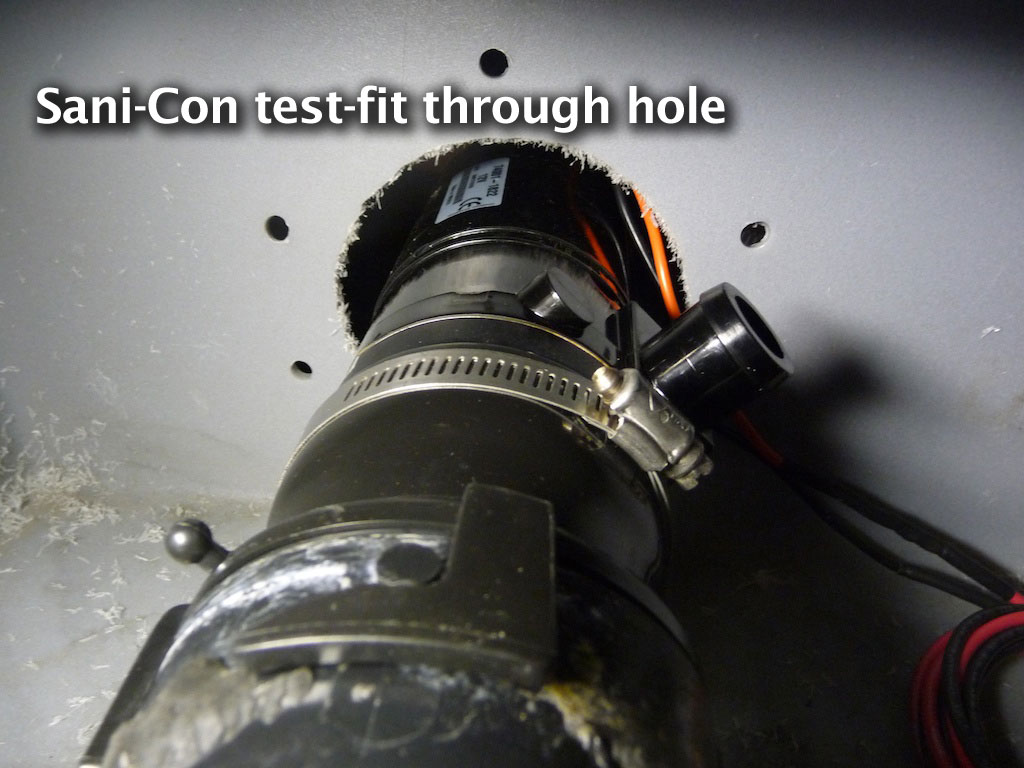
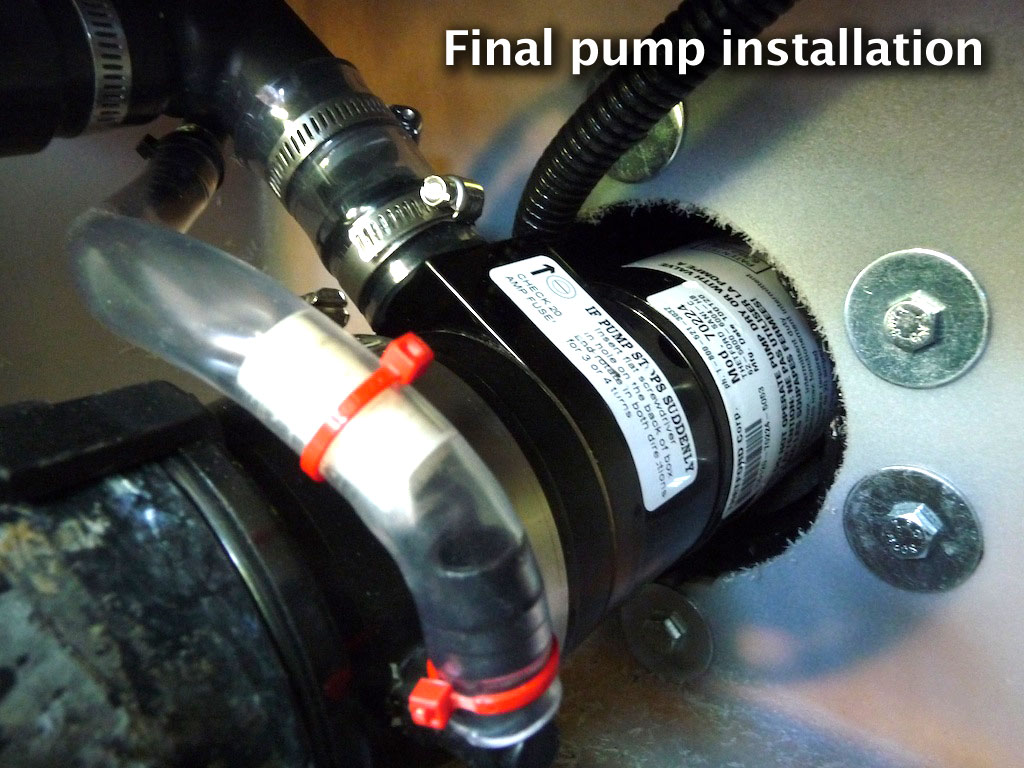
I cut the hole in the WSC's wall with a side-cutting bit in my Moto-Tool with a router attachment (see photo above). It cut easily through the soft polypropylene. Once the hole was cut and the debris was vacuumed out of the WSC's interior, I test-fit the Sani-Con. It lined up in the hole beautifully.
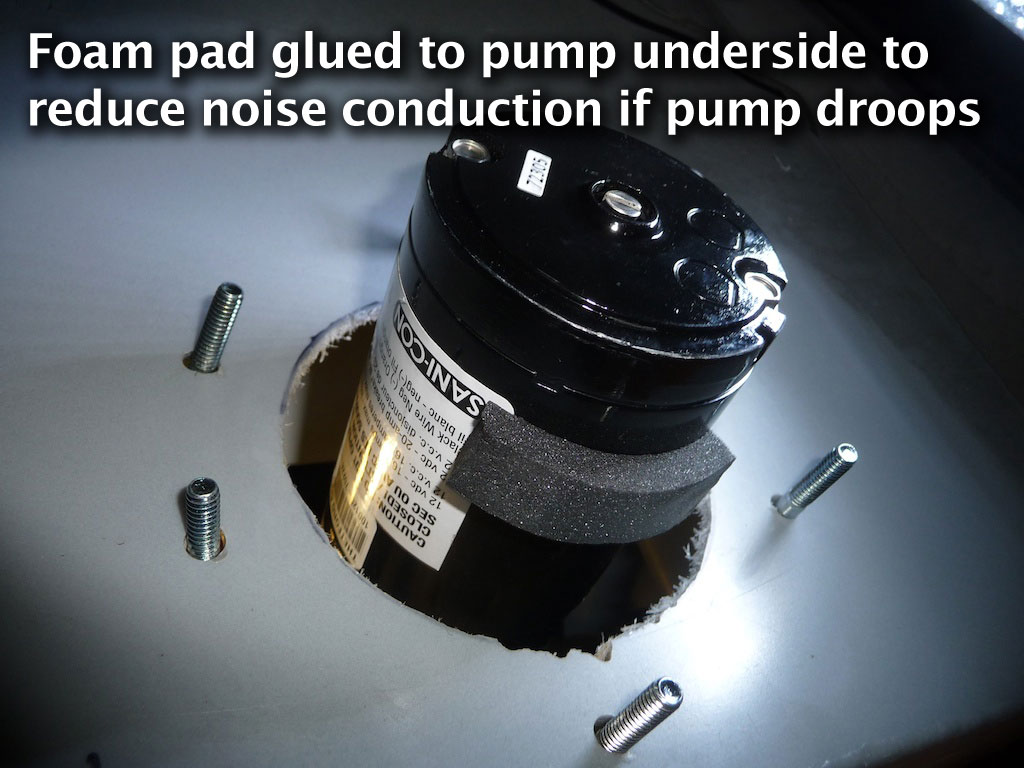
After test-fitting the WSC extension, it occurred to me that the Sani-Con pump might eventually sag from its horizontal position until it came into contact with the ABS tubing. While this wouldn't be an operational problem, it would probably conduct a lot of motor noise into the coach. I glued a patch of dense closed-cell foam to the bottom of the pump motor which pretty much filled the gap between the bottom of the motor and the inside bottom of the WSC extension.
I then applied a bead of RTV sealant to the closet flange's face and bolted it to the side of the WSC, using fender washers inside to help distribute the load on the soft polypropylene wall.
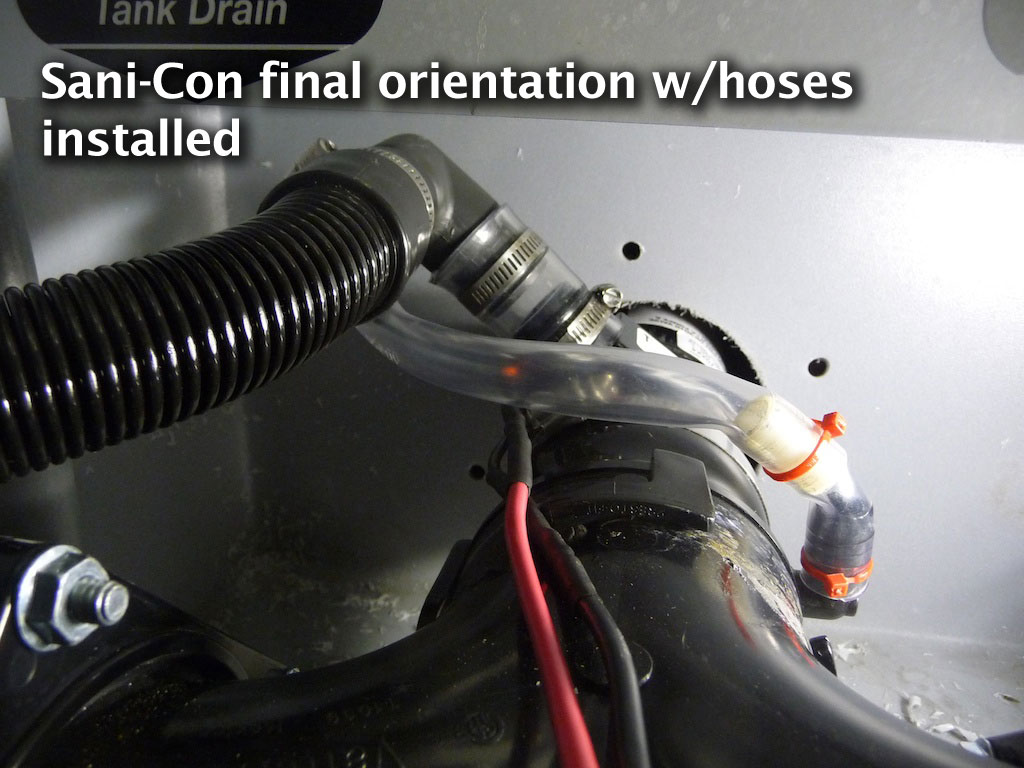
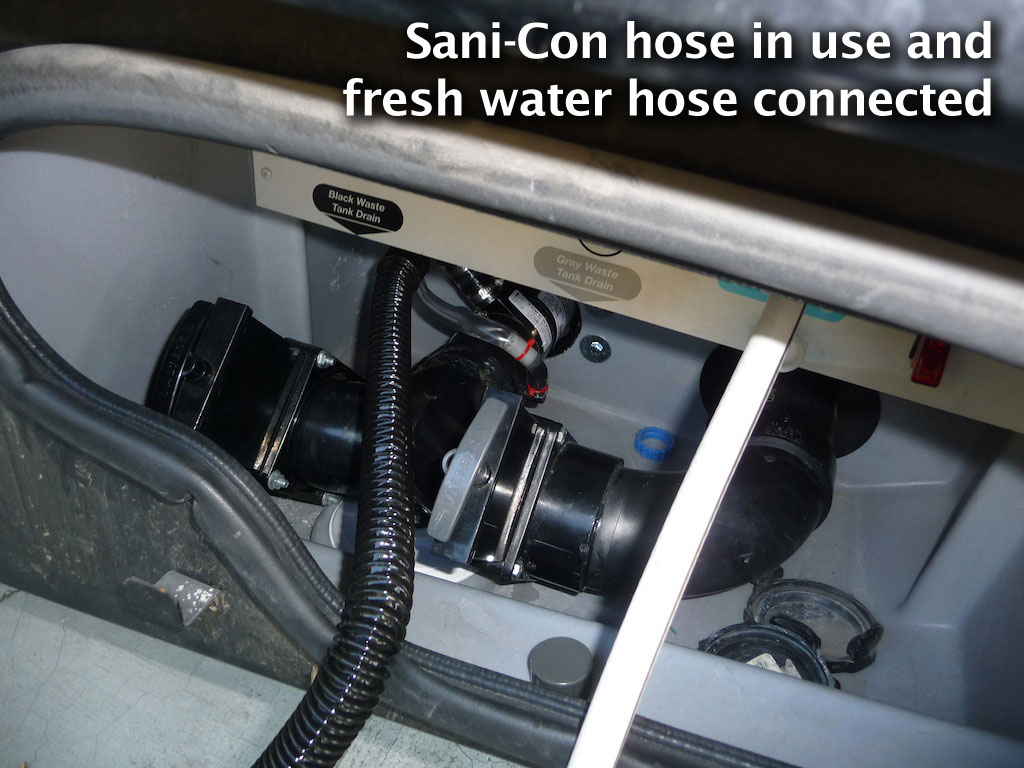
The bayonet fitting on the T-connector and the Sani-Con provides for four possible orientations, 90 degrees apart. None of these four positions made a comfortable position for the Sani-Con's flexible output hose, so I loosened the hose clamp which mates the Sani-Con pump to its sewer bayonet adapter and turned the pump about 45 degrees, so that the output elbow ended up at about 10 o'clock, as viewed from the WSC door opening. This distorted the clear "grey water bypass" hose (a "feature" that allows users to leave the grey water valve open while connected at a campsite) causing the hose to slightly kink. My kind of clunky solution was to put a stiff nylon bushing inside the hose at the kink and clamp it in place with nylon wire ties. It's worked so far, and we haven't used the bypass in any case.

I do recall that I worried during the reassembly that I couldn't tell if the slide valve seals were in their correct position when I finally snugged all the bolts. Because all the parts had to be jockeyed around to re-join with the two water tanks and the new T-connector position, there was some significant resistance to the flanges closing up flush. Because of this, it might have been possible to pinch a neoprene seal out of position while torquing down the bolt. After the assembly, I test-operated both slides a lot, and they seemed quite a bit higher-effort than previously, but I let it go. For what it's worth, neither slide has leaked, and we've operated the system about 30 times so far without a problem.
In addition to tightening up the eight nut/bolt connections on the two slide valve flanges with the pump at my desired angle, I reconnected all the rubber coupler hoses to the grey and black tanks and tightened their hose clamps.
I re-installed the three-piece flange around the grey water pipe by screwing the pieces to the WSC's wall while holding them snugly against the pipe. I then applied urethane foam sealant to the outside of the flange and pipe to weather-proof the opening.
(click and hold on any image to zoom larger)
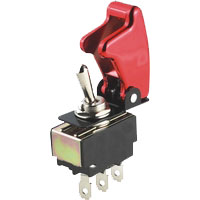 Instead of using the original Sani-Con switch, I bought a 12VDC 20-amp toggle switch with a safety cover. Since the Sani-Con's hose assembly and possibly other items might be bouncing around in the WSC compartment while we're rolling down the road, I hoped to avoid accidental activation of the pump (which Thetford warns should NOT be run dry for any period of time). Additionally, the switch can easily be turned off by simply slapping the switch safety cover - good for emergencies and when operating the pump from awkward positions (given the location of the WSC, this describes pretty much ANY operating position).
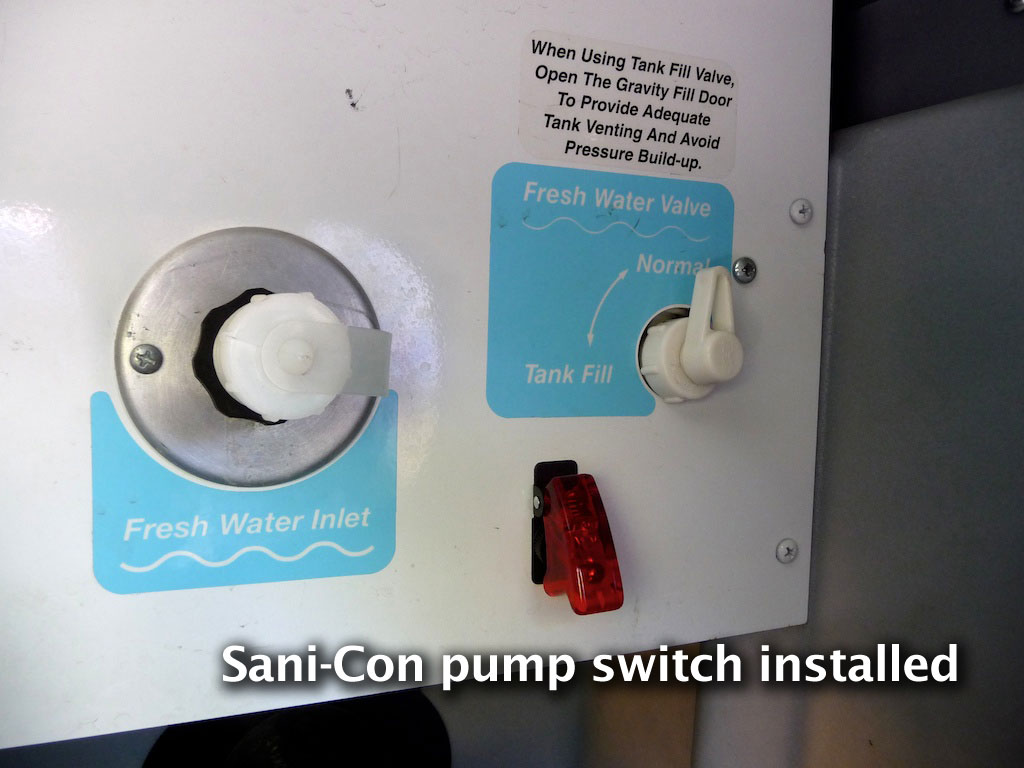
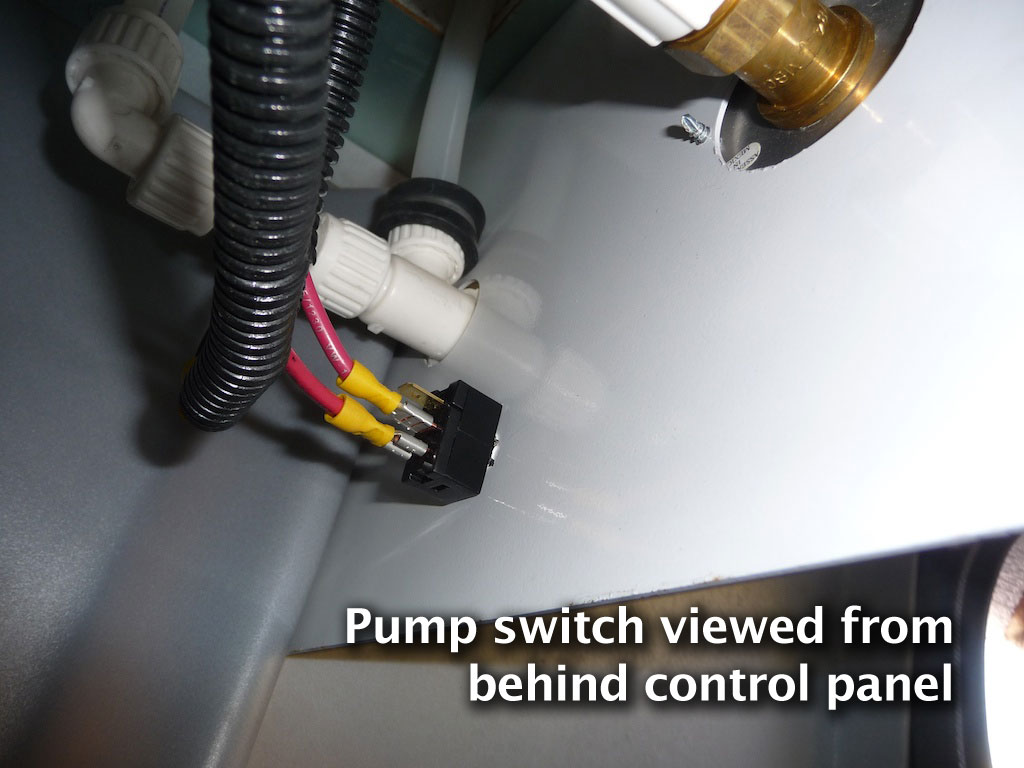
I installed the switch on the WSC's control panel, below the selector valve which diverts fresh water supply to the house or fresh water holding tank. I drilled a hole in the metal panel and installed the switch. I connected the switch to the hot side of the Sani-Con (red/positive) with a short piece of 12 gauge stranded wire. I added labels to the panel for the Sani-Con pump switch.
I then moved to the interior of the Navion to run supply wiring. After first disconnecting the 12-volt house power supply AND the 120 volt shore line power (VERY important!), I removed the cover from the Navion's house fuse/breaker box. I then removed the screws anchoring the Electrical Distribution System (EDS) to the cabinet below the refrigerator. In the ('06 23J) under-sink cabinet, I removed the lower back wall panel to expose the house floor where some piping and wiring passes down underneath the vehicle. The panel is secured with staples, and removing the panel is a tricky topological puzzle, requiring (I think) a slight bit of bending of the panel to remove and install, but it is doable.
The EDS panel can be moved quite a bit with its cables trailing behind, and gives good access to the area under the refrigerator, and to the back of the EDS box.
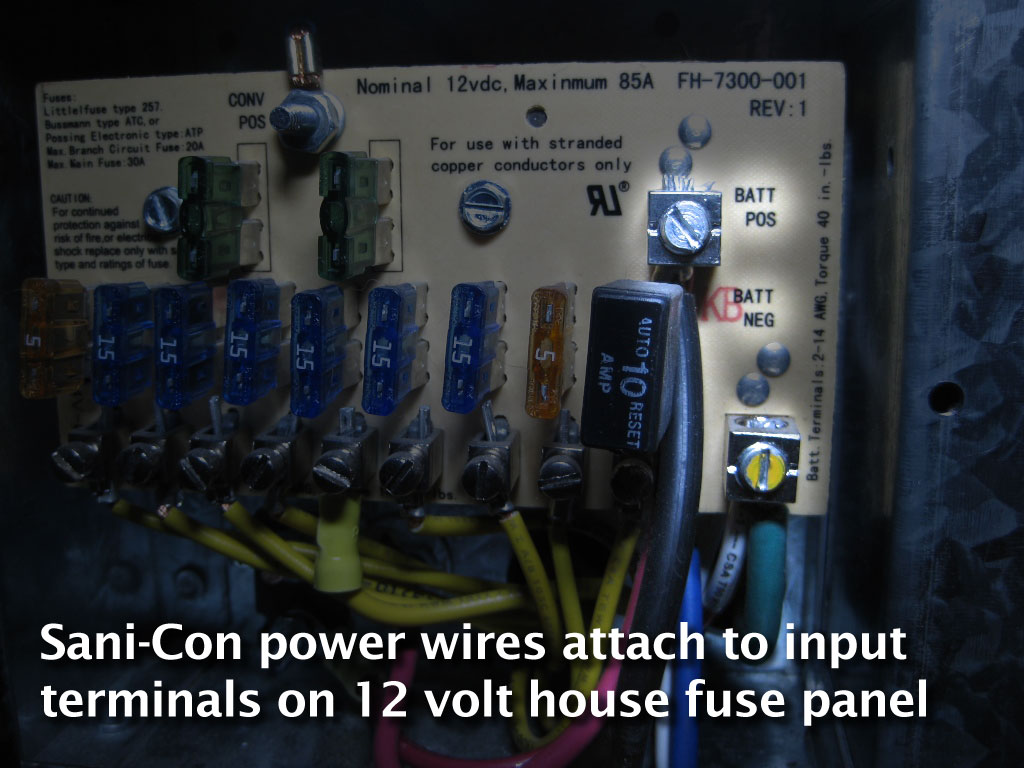
Starting at the EDS panel, I ran two 15-foot pieces of 10 gauge stranded wire (a bit of overkill, since the Sani-Con manual recommends 10 gauge only if exceeding 20 feet - my wires travel only about 12 feet in total) along the floor under the refrigerator, and down through an existing hole alongside some existing wires which passed from behind the sink underneath the Navion. At the EDS' breaker/fuse panel, I clamped the Sani-Con ground wire with the existing green-coded 6-gauge wire into the "BATT NEG" terminal feeding the panel from the house batteries.
I ran a short piece of 12 gauge wire from the EDS' "BATT POS" terminal (again clamping it along with the existing house batteries hot wire) to the hot side of the circuit breaker supplied with the Sani-Con. To the load side of the Sani-Con breaker, I attached to the "hot" 12 gauge wire running down through the floor toward the pump.
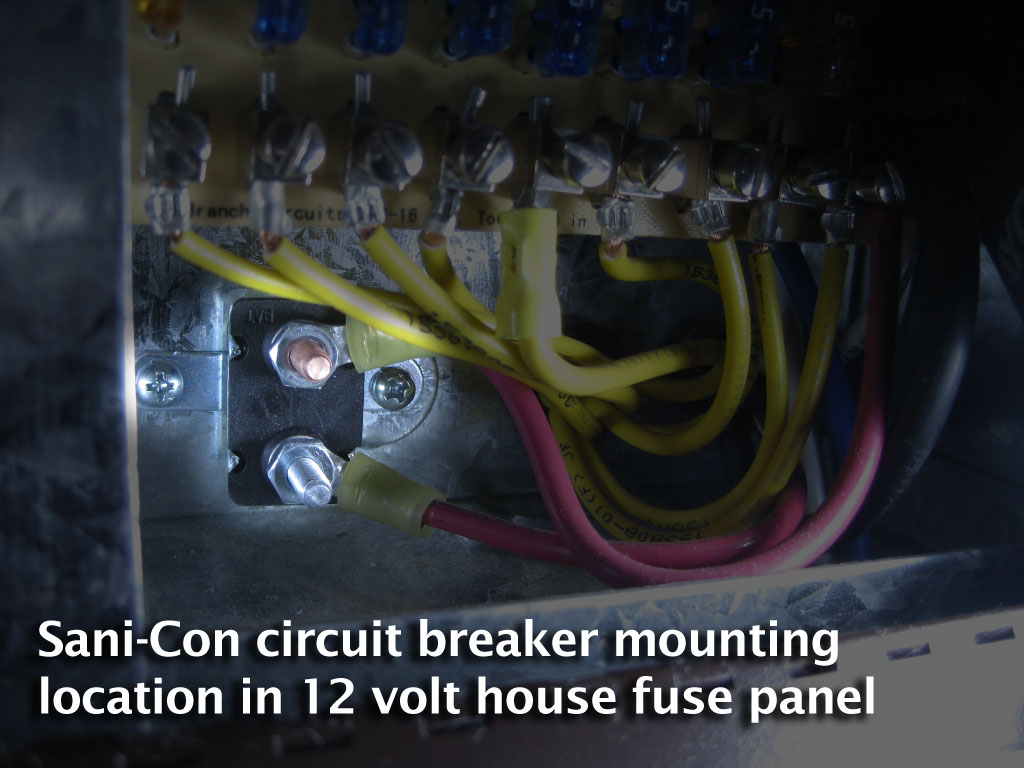
I mounted the Sani-Con circuit breaker in the back of the EDS box with a couple of self-tapping sheet metal screws, careful to avoid poking or cutting any wiring behind the box.
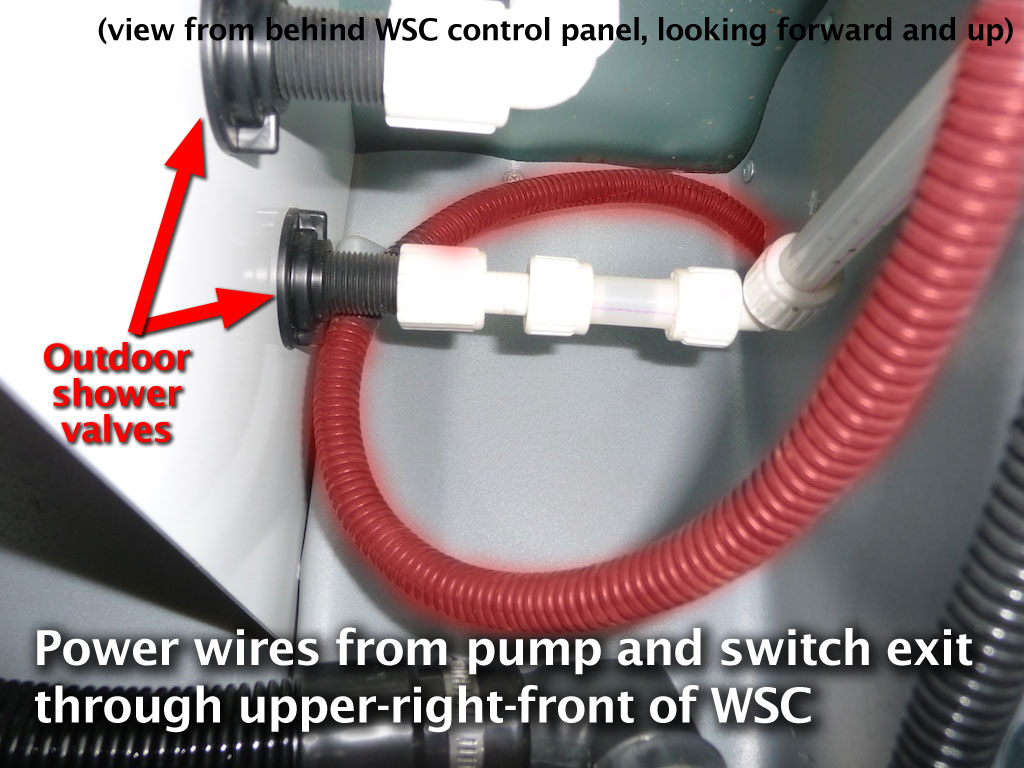
Outside the Navion, I added 1/2" flexible plastic conduit to the full length of the two wires now hanging underneath. I used friction tape to join this new conduit to the existing conduit through which I'd passed the wires through the floor to protect the wires from cutting and abrasion. I passed the conduit-encased wires along the top outer edge of the black water tank, behind the steel sides of the lower service compartments. I used nylon wire ties to anchor the conduit as I went. At the gap between the black water tank and and the Water Service Center, I turned the conduit inboard toward the center of the vehicle, following the front top edge of the WSC. Drilling a hole through the front-top corner of the right side fo the WSC, I then passed the conduit through to the inside of the WSC. Here, I terminated the hot wire and the conduit at the newly-installed pump control switch. From the switch, a second piece of conduit containing the wire from other side of the switch and the ground wire from the EDS panel forked off toward the pump. Here, the ground wires and switched hot wires were connected to their corresponding wires from the Sani-Con pump. The conduit was trimmed to terminate at the pump body.
I temporarily restored DC power and bumped the pump switch quickly on and off to confirm that the pump was receiving power and operating correctly. I once again disconnected the power for reassembly.
Inside, I added plastic conduit to the wires from the EDS to the conduit where the wire passed through the floor. I then replaced the under-sink panel, EDS box, and EDS front panel.
We ran water into the black water tank for testing. I removed the cap from the Sani-Con hose (I've forgotten to do this once or twice at campgrounds - a bit worrisome as I don't know how much pressure the pump makes, or the hose can withstand) and pointed it in a safe direction. I opened the black water valve and switched on the pump. It worked! Water pumped out vigorously (but not violently), and the hose expanded in length by at least 100 per cent, simply increasing the size of the coils in which it lay on the ground. When the pump is turned off, the hose retracts to its 7-foot storage length.
A note about the loudness of the Sani-Con pump. I'd noted mention of users being concerned about disturbing fellow campers in my early research. Though the pump is fairly noisy when standing at the compartment, I've experimentally walked away from the RV while it was pumping to see how the sound propagated. I really think it wouldn't be noticeable in another motor home that was 20 feet away - provided its windows were closed. I might be hesitant to run the Sani-Con at 5:30am in a quiet campground, but then you may have no choice. If you're leaving the campground, a less-disturbing option would be to use a community dump station that might be further from sleeping campers. Despite the fact that we're talking about trying not to disturb people - after all, we're going to start a diesel engine and drive away - I'm still a bit sensitive about making noise. The Sani-Con claims to pump 12 gallons per minute, so pumping 30 gallons of black water - plus 10+ gallons of grey water "cross-flush" (more about that in a moment), takes about 4 minutes - which would be plenty of time to get irritated if I were trying to sleep and my neighbor was making a lot of noise.
I adopted the technique of "cross-flushing" from Richard's blog, and test-pumping grey water from Thetford's own instructions. The test-pumping is to determine that the pump is in working order before opening the black water valve. If you opened it an THEN discovered that the pump was faulty or jammed, you'd have to disassemble it with however much sewage flowed between the black water valve and the Sani-Con - to say the least, this would NOT BE FUN.
Here is my procedure (Updated 9/10/11 to correct several missing steps):
A future project is the removal of the pneumatic lift strut which holds the WSC's door open, and installation of a hook mechanism to retain the door open in a vertical position - like the one which already exists over the propane tank. Why Winnebago thought we'd all want to bend over awkwardly to reach under a horizontally-held door on a daily basis puzzles me. Update 9/10/11 DONE! And one of the best modifications I've done, which affects me every single day on the road. I'll try to get a Web page of this mod up soon.
So far, we've had faultless operation of the Sani-Con. But I've thought about what might have to be done in the event of a Sani-Con failure with the tight quarters of our particular installation.
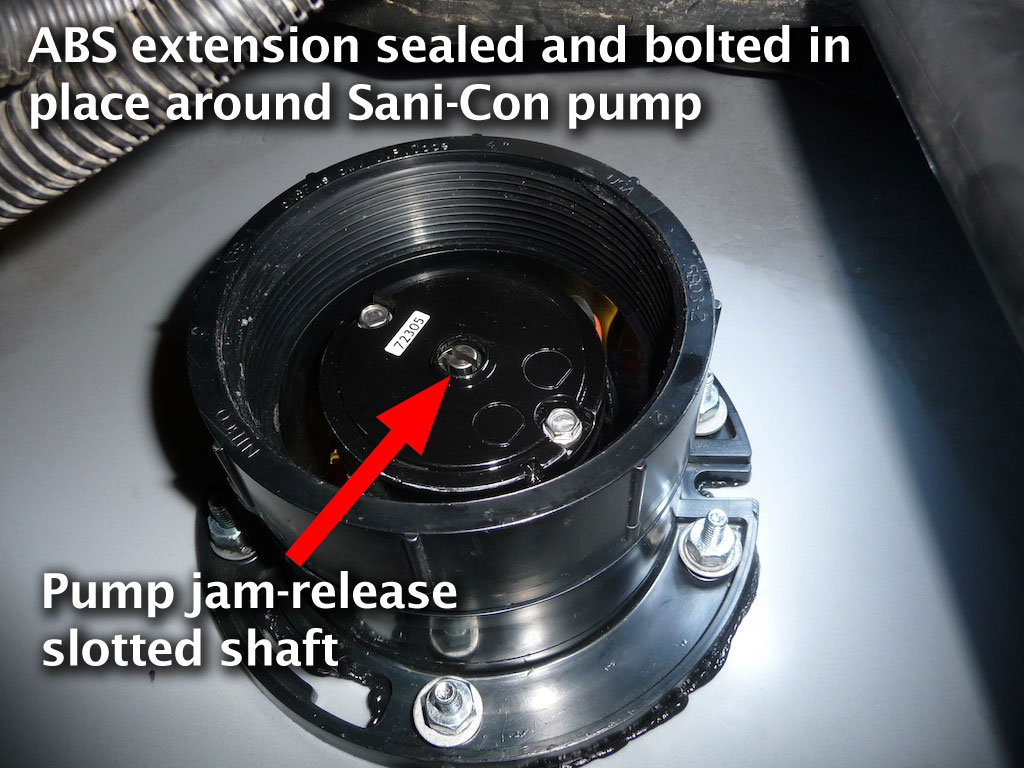
First of all, the Sani-Con has a screwdriver slot in the bottom of the pump motor shaft. As with household garbage disposals, this is intended as a jam-breaking solution. But what if the Sani-Con just doesn't work, and you have to empty your tanks?
I'm not actually certain that I can remove the Sani-Con with my "WSC Extension" in place, since the pump was installed before the extension was bolted on. But removing the WSC extension wouldn't be that hard - it's only six nuts and bolts. With the WSC extension and pump removed, a conventional sewer hose could be connected to the T-connector and routed out through the extension's hole. Until a Sani-Con problem was resolved, this could be an ongoing, if awkward solution. We carry an unused sewer hose for just this purpose. Hopefully, we'll never have to use it.
9/10/11 Update: NEVER, NEVER USE ANYTHING BUT RV TISSUE
In a little over a year and 17,000 miles and 70-80 nights in 46 U.S. states and 6 Canadian provinces, we have had one issue with the Sani-Con, and that involved stupidly breaking the Thetford's Cardinal Rule of Macerating Pumps:
In our case, the mistake was assuming that a "flushable" towlette was OK. It was absolutely NOT. Unlike special dissolving RV toilet tissue, these towlettes turned out to be made of completely non-decomposing fibers, which the Sani-Con could NOT mascerate - at all. They partially blocked the passages in the mascerator pump chamber and caused it to run faster than normal and move liquid much slower. This was good in that we immediately knew something was amiss, and that it still allowed the Sani-Con to work - albeit at somewhat reduced flow rate. Fortunately, it was the last leg of a trip on the way home. UN-fortunately, it required me disassembling the system (after pumping a few gallons of bleach through it) and removing the towlettes from the Sani-Con impeller. My WSC Extension allowed me to disconnect the pump from the 3" barb at the T-connector and move it enough that I could get to the impeller and clear the towlette fibers - some of which had wrapped around the impeller shaft - with some needle nose pliers. It was awkard reaching inside the compartment, and took some time, but it was doable. We've subseqently used the system for a 30-night trip with no problems.
We love it! We'll never go back to the 3" sewer hose again. I'm thrilled to be able to use our Navion's toilet all the way to our driveway on the return leg of a trip, and pump the tanks into the P-trap in the front of our house via a (dedicated) garden hose at my leisure. And if we have guests staying over, there's the option of their having a private home in our driveway for an extended period of time. Fantastic!
This was NOT an easy installation, as you can see from this document. If this doesn't sound like something you'd want to attempt yourself, you may be fortunate enough to find an RV service center willing to attempt something similar.
Happy trails!

 |
All contents Copyright 2013-2023 Ellsworth Chou |