Wouldn't it be neat if after you got back from that vacation to a far-off country you had a way to see a "breadcrumb" trail on a map of everywhere you went, whether on foot, in a boat, or in a wheeled vehicle? And wouldn't it be even cooler if you could see where you were when you took every photograph? Here's how I did it on a Macintosh with about $140 in hardware and software.
Update 6/1/08: The ATP Photo Finder ($100 MSRP, $80 street) allows you to geotag photo files directly while they are on the memory card, so no computer is required to add GPS information to the image files.
PARTS REQUIRED
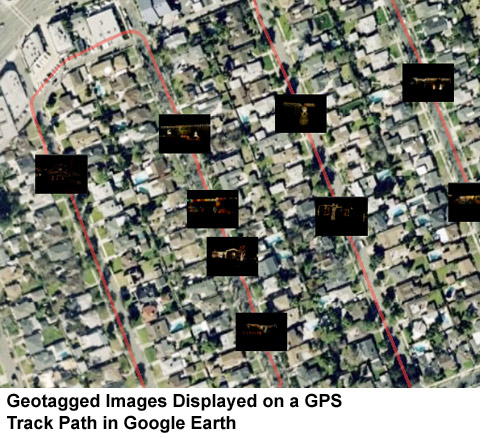
Geotagging photographs (also called "geocoding") is the process of embedding geographical information within digital image files. This might be a human-readable street address, but the compelling practice is to store latitude and longitude (lat/long) within the file. (The EXIF standard for image files metadata provides for lat/long info in addition to typical photographic parameters such as shutter speed, focal length and ASA rating.) Once an image file has this geographic data permanently associated with it, many solutions exist to represent that photograph's location on a map or aerial photograph. (see image below)
 For some time, photography enthusiasts have been geocoding their photos manually by using address search features in online photo sites such as Flickr and Picasa, which then attach the location of each photograph to the image file itself. Increasingly, solutions have been developed to automatically collect geographical data using inexpensive GPS receivers. Even though a handful of digital cameras with integrated GPS receivers are manufactured, this is obviously a poor solution for most hobbyists or professionals who would not be satisfied with whatever quality and features these few GPS-equipped cameras have.
More recently, a very clever solution has provided a new way of incorporating the "track files" of a GPS "logger" (a GPS receiver capable of independently storing periodic "waypoints") with photographs taken on any digital camera. No connection is made between the devices - the process depends entirely upon the digital camera's built-in clock used to "time stamp" each image file. By using a piece of software after the fact to correlate the time stamps on each photo to the time stamps embedded in the GPS device's track log, software interpolates where in the "breadcrumb trail" each photograph was taken.
While the many GPS devices available as hiking aids will work for this task, there is a new class of "GPS loggers" which forgo having a display for the sake of compactness. I found a Mac-compatible GPS logger about the size of a small box of matches.
A MAC-COMPATIBLE GPS LOGGER
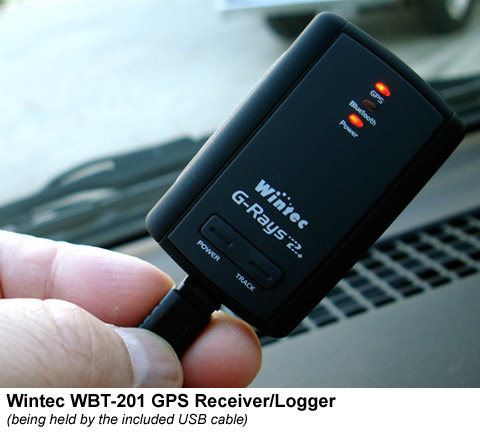 After much research, I bought the Taiwanese-made Wintec WBT-201 (under $100 from many online stores) to use as my GPS logger. This small (2.3" x 1.5" x 0.7") box acts as a USB- and Bluetooth-connected receiver in concert with personal computers and PDAs, but also functions as a standalone GPS track-logging device. The manufacturer claims that it will run for 15 hours on its rechargeable battery in standalone logging mode, or 12 hours with its Bluetooth transceiver turned on. The WBT-201 will also run from an external USB power source. Most importantly, it was one of only a few such devices for which I could find strong evidence of Macintosh support, when used with HoudahGeo and HoudahGPS software.
The WBT-201 "G-Rays 2" (a typically bizarre import product name) is a simple device. In the photo above, you can see all of its features: three LEDs, two buttons, and a mini-USB jack at one end. The one button allows the user to turn the unit on and off, and to turn off the Bluetooth transceiver to save power when used as a standalone logger. The second button allows the user to manually "mark" a location in the recorded track as well as re-starting a new track. The WBT-201's documentation is a small bilingual booklet (English and Chinese). The English manual is written in only slightly mangled English, and a bit obtuse - I'm still not certain what it means to "re-start a new track," but so far, it hasn't mattered. I mini-CD (8cm) is included with Windows software, but I have no intention of using it (all online reviewers agreed that the included Windows software was not good at all).
Like any GPS receiver, when the WBT-201 is started in a new geographic location, it may take several minutes to load a GPS "almanac" of the orbits of the all the GPS satellites relative to the current location - the manual says this may take as much as 13 minutes. Subsequent daily "cold" starts of the WBT-201 take around one minute to acquire a GPS "lock." "Warm" starts after shutting off the WBT-201 for a few hours can be are astonishingly fast - under 7 seconds from power on to actually establishing its position. Considering the diminutive size of the entire unit, it must have the smallest satellite antenna of any GPS receiver I've spent time with, the WBT-201's sensitivity is very impressive. Walking around with the unit in my shirt pocket - where my body and head blocks a view of the sky in many orientations, I saw no fewer than 8 satellites and typically 10, regardless of the direction I was facing (I did this testing on my Palm Tungsten T5 running Cetus GPS freeware, connected to the WBT-201 by a Bluetooth connection). In fact, the WBT-201 maintained no fewer than 6 satellites everywhere inside my house. I've been able to get GPS signals in one room of our one-story house, but never in every room - really amazing. This sensitivity allows the user greater range of possibilities for carrying the logger - a shirt pocket may be fine, and the device has a pass-through for a small camera-style lanyard - though none was provided. Because the unit is so small, I discovered that I could put it on my shoulder under my shirt to do walk-around testing.
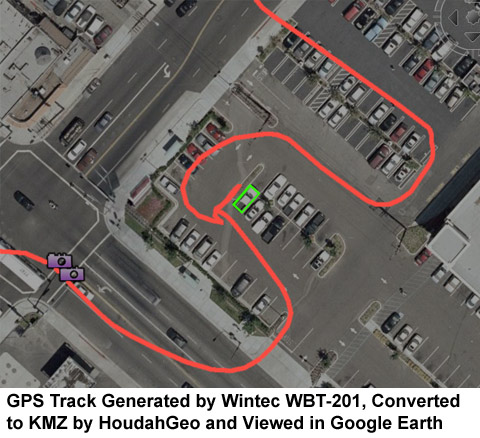 After driving around with the WBT-201 on our car's dashboard for a day's errands, viewing the track in Google Earth reveals what I would consider very good accuracy and resolution. I was surprised to find that the WBT-201 appears to be able to store a position at a maximum frequency of every second - enough that when making moderate speed turns, the path appears curved. In the the photo at right, the green rectangle outlines the actual parking space where we parked - the track is about one parking space off, about 6-7 feet (2m). The actual offset is south and west, as you can see where the track at the left edge of the picture approaches the two purple camera icons - the car was actually in the left-turn lane heading NW. I did a short walking test with the Palm software and the resulting track of this low-speed (I averaged 2.3mph for 1300 feet) experiment "weaves" slightly about 6-7 feet. Nonetheless, I'm thoroughly satisfied with the performance of the unit. The WBT-201 stores a maximum of 131,072 data points, and from examining the log files I see that it apparently records a data point only when its position changes, so it could continuously record movement for at least 36 hours. When the WBT-201 fills its available memory, it begins to overwrite the oldest data, keeping the newest 130,072 points.
The WBT-201 was designed to use the BL-4C lithium-ion battery from Nokia 5100- and 6100-series cellular phones, which were immensely popular a few years ago. These batteries can be found for under $10 with shipping from dozens of online sources. Having a spare or two would give the photographer some freedom from having to get to a charging source for a couple of days of vacation. Wintec thoughtfully provides an USB cable (the WBT-201's data/charge port is a mini-USB, part of a great trend in consumer electronics to use this ubiquitous form-factor) and both an AC-powered and cigarette-lighter DC-powered USB charger.
Considering that there are few GPS loggers that have been vetted for the Mac, the Wintec WBT-201 turned out to be a pleasantly satisfying product. Using the WBT-201 as a GPS receiver via Bluetooth to my Palm T5 was simple and trouble-free. It just works.
MAC SOFTWARE FOR GEOTAGGING PHOTOS
I bought HoudahGeo software ($29.95 download) after testing the free demo download (which is limited to exporting 3 images per project). HoudahGeo is fairly simple to use, though the interface suffers from some strange concepts. The application's operation could be more clearly explained in its Help menu, and there is no other manual provided.
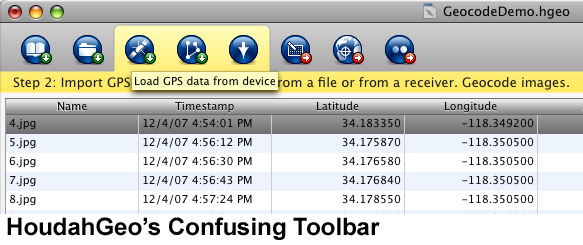 HoudahGeo takes a step-by-step approach, suggesting that the user move between three steps: 1) add images; 2) import GPS data and geocode images; and 3) export and view geocoded images. Their interface is a bit confusing, however, highlighting two or three buttons for each step in a toolbar across the top of the application's single window, of which only one button is appropriate for your particular workflow. Cryptic icons on the buttons are of little help, so the user must position the cursor over each button and wait for the contextual descriptive label to appear, but only after first waiting for the colored background for the current step to to change. Trying to use the interface quickly is a bit clunky, as you must pause at many points to wait for the group of buttons to highlight, then wait again for the label of the button you're hovering over to appear. There are pull-down menu equivalents for the toolbar buttons, but some of the names are completely different for the same functions.
While HoudahGeo does import from Apple iPhoto and Apple Aperture libraries, Houdah recommends against this procedure because of some technical limitations of iPhoto and Aperture. (See the note below for details.)
NOTE: Houdah's FAQ says that because of the way that iPhoto caches EXIF data, that it will ignore changes actually made to the image files in its library, apparently including the deletion of the original and replacement with a geocoded duplicate. Aperture does not export original files, but lower-resolution proxy images, so exporting from and re-importing to Aperture would destroy the higher-quality original. Houdah's recommendation is to import the image files to the Finder, geocode and tag the files with HoudahGeo, then import the geocoded image files into iPhoto or Aperture.So if you plan to geocode photos, instead of using the "import" features in iPhoto or Aperture to retrieve image files from your camera, you'll want to instead copy the images in the Finder from the camera's storage media to a folder in the Finder first, then geocode with HoudahGeo. HoudahGeo also allows users to "Add Images from Files," importing one or more image files directly from a mounted volume. The geocoded image files can then be imported into iPhoto or Aperture to use their photo organization features. (Embedding geotag data in the photos' EXIF header is not destructive to the image file.)
Once a set of image files has been imported, HoudahGeo allows the user to import GPS track data directly from a logging device; from a GPS track file; or manually by allowing the user to indicate a location on a Google Maps window. However, there doesn't appear to be a way to text search the Google Maps sheet, so the user is forced to zoom and drag to the location somewhere in the world - requiring the user to have a pretty good sense of geography as well as mastery of the Google Maps interface.
HoudahGeo can only communicate with the Wintec WBT-201 via Bluetooth (there is currently no Mac support for connecting these components), and the process is pretty straightforward. Pairing the WBT-201 with your Mac (which must have Bluetooth either built-in or use an add-on USB Bluetooth transceiver) is simple, the passkey is "0000" and only has to be input on the Mac.
Alternatively, HoudahGeo can import track log files in either the GPX or NMEA file format. Curiously, HoudahGeo can't export track log files which it retrieves from GPS devices. Houdah offers their free HoudahGPS to import log files from GPS devices made by Garmin, Magellan and Wintec, and converts the files to either GPX, NMEA or KML (Google Earth) files. HoudahGPS can also import "Sony Log" files and output to the same three formats. So if you wish to archive the track log files, importing them from the GPS device with HoudahGPS and then choosing "Load GPS Data from File" in HoudahGeo's "Geo" menu for Step 2.
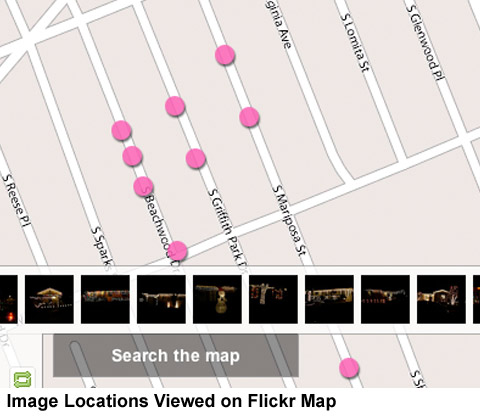 Finally, HoudahGeo can write geocode data in the EXIF headers of the image files (or copies of the files), export a Google Earth KMZ file (unlike the KML file, the KMZ includes image files) or export geocoded photos to Yahoo!'s popular Flickr online photo sharing service (see sample at right), where online visitors can view maps of the photo locations. (As of early December 2007, I can't recommend trying to import geocoded images into Flickr because of problems with their service. See details below "A Better Way to Display Geotagged Photos Online: Picasa Web.")
HoudahGeo isn't perfect, and it could use some interface improvements and better documentation, but it does as advertised, and I was able to get my first GPS track populated with clickable image thumbnails into Google Earth within a few minutes. There is a paucity of Mac software solutions for geocoding, and this is a one-stop application to join the exciting world of geocoding.
HoudahGeo requires Mac OS 10.4.8 or newer, a digital camera and (optionally) a GPS device which can log waypoints.
A BETTER WAY TO DISPLAY GEOTAGGED PHOTOS ONLINE: PICASA WEB
Frankly, though uploading to Flickr from HoudahGeo is theoretically as simple as clicking a button, how Flickr handles the results is kind of unfriendly. It only displays the locations of your geotagged photos as pink dots (as seen in the above sample of a Flickr page) when those photos appear in the scrolling browser at the bottom of the screen. When you scroll to see more photos, their locations on the map disappear. Furthermore, uploading to Flickr manually or using the Flickr Upoadr application does not place the images on a map - Flickr only allows users to manually position uploaded images on a map. Furthermore, I've had problems getting geocoded images to appear in Flickr maps, and apparently I'm not alone - many others report continuing problems with uploading geotagged images to Flickr.
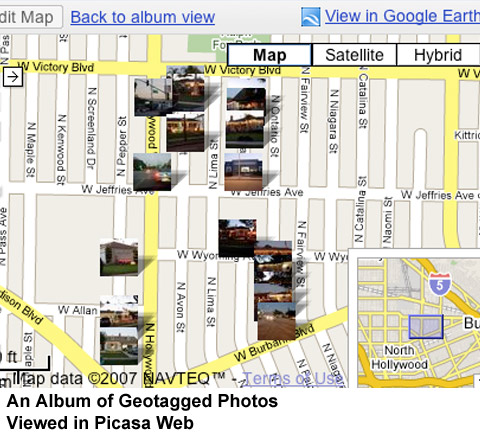 Google's Picasa Web online photo service is much more clever - if you upload geocoded images, their position is automatically displayed on every image's display page. If you click on "View Album Map" or the "View Map" button in an album view, a map automatically displays all the images in the album as thumbnails on a street map. A "View in Google Earth" button reveals a neat benefit to Picasa Web users - once your files are in a Picasa online album (and viewing preferences are set to "Public"), they are available to anyone with Google Earth installed on their computers. This allows others to view your geotagged photos in Google Earth without your having to email them a KMZ file or host the KMZ file on a file server (note that the red paths and waypoints which HoudahGeo creates in KMZ files won't appear in these Picasa Web-based photos in Google Earth).
A TRICK TO COMPENSATE FOR AN INACCURATE CAMERA CLOCK
If you head out with your GPS logger and digital camera and neglect to set the camera's clock accurately (or it has drifted over time), this will produce undesirable results when geocoding later. Particularly if photographs were taken from a fast-moving vehicle, a clock set only a few minutes fast or slow can cause the photos' estimated positions to vary greatly. At 60mph, you travel one mile every minute - so a couple of minute error could create meaningless results. Even 10 or 15 seconds in urban traffic will offset the calculated position of a photo by a half-block.
Because the Global Positioning System (GPS) works based upon each of its satellites having one of the accurate timepieces known to man (learn more about GPS here), the GPS data's time stamps can be assumed to be accurate. Setting your digital camera's time as accurately as possible (almost all cameras can be set to within a second, but the procedure can be tricky) is an important part of preparing for geocoded photography (we always set all of our cameras' clocks as accurately as possible before vacations, so that they will automatically sort in chronological order regardless of whose camera is being used). However, I have a trick I use to compensate for forgetting to set the camera's clock.
Soon before or after I know that I want accurate time-stamping on my digital cameras, I will use each camera to take a photograph of a known-accurate clock or watch (if the GPS receiver has a clock, this is the very best time reference). We own a number of "radio-controlled" clocks and watches which set themselves automatically to a broadcast radio signal, so I simply shoot a close-up of the clock with each camera. (Important: the clock must display the seconds for this trick to be useful.) By later viewing this image on the camera or in a photo-viewing program that shows the time at which the photo was taken, it is a simple matter to see whether there is a discrepancy between the photographed time and the camera's time. I've been using Joe Maller's excellent iPhoto AppleScripts iPhoto Date Shifter and iPhoto Time Shifter to synchronize multiple cameras, but it works well for this purpose. HoudahGeo software (Mac software used to geocode photos with GPS track logs, see below in this article) has incorporates this functionality in the "Camera Setup..." item of HoudahGeo's "Images" menu.
I've posted samples of geotagged photos (of houses decorated with holiday lights) as a Google Earth KMZ file download (812KB, includes photos and GPS track path) and a Picasa Web Album map.
Geotagging your photos can be a great way to relive a vacation or to share information with others. Tools like the Wintec WBT-201 and HoudahGeo make the process simple for Macintosh users. (Many more solutions and websites exist for geotagging for the "rest" of the operating systems.)